1 Installation and first start
ExactCut is a program for Windows 10 and 11 (64-bit). From a catalogue of vehicle templates it prepares a precise cutting plan for paint protection film (PPF), car wrap and window tint and sends it straight to a cutting plotter. This chapter walks you through downloading, installing, creating an account and signing in for the first time.
What you need
- A computer with Windows 10 or 11 (64-bit). An ordinary office computer is enough; only part layout (auto-nesting) is demanding, and it uses all processor cores.
- A monitor with a resolution of at least 1366 × 768 px. The program adapts to the screen size on its own (chapter Settings).
- An internet connection. The template catalogue, saved projects, credit and updates live on the server, so the program does not work offline.
- A cutting plotter that speaks HPGL (Roland, Graphtec, Summa, Mimaki, GCC and others), connected over USB, a serial port or the network. It is set up inside the program (chapter Cutting devices).
Download and installation
- On exactcut.sk, in the Downloads section, click Download ZIP.
- Extract the downloaded file: right-click it and choose Extract All. Inside is the installer
ExactCut-x.y.z.exe. - Run the installer. Windows asks for administrator consent; the installation is for all users of the computer.
- Choose the wizard language (nine languages are offered) and accept the licence terms.
- Keep the target folder
C:\Program Files\Draftex\ExactCut. The option Create a desktop icon adds a shortcut to the desktop; there is always one in the Start menu. - When it finishes, leave Launch ExactCut ticked and click Finish.
Warning: Windows SmartScreen may show a blue window saying "Windows protected your PC" the first time you run the installer. Click More info and then Run anyway. The installer is signed with the certificate of Draftex s. r. o.; you can check it in the file properties on the Digital Signatures tab.
When you update, the installer removes the older version by itself; settings and sign-in are kept.
Account
The program signs in to an account on the ExactCut server. You do not create the account in the program but on exactcut.sk with the Create account form. We prepare your access within 24 hours and send the sign-in details by e-mail. A new account has a trial credit of 3 m², so you can try cutting without paying.
Signing in

- Account Email.
- Password.
- Remember me: next time the fields are filled in and you only confirm.
- Forgot password? sends a new password to your e-mail (below).
- Log in (or the Enter key).
- Quit closes the program.
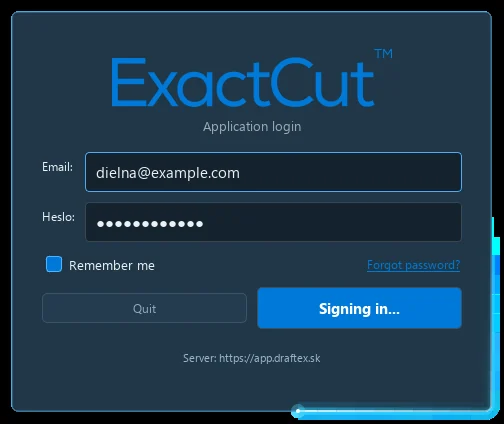
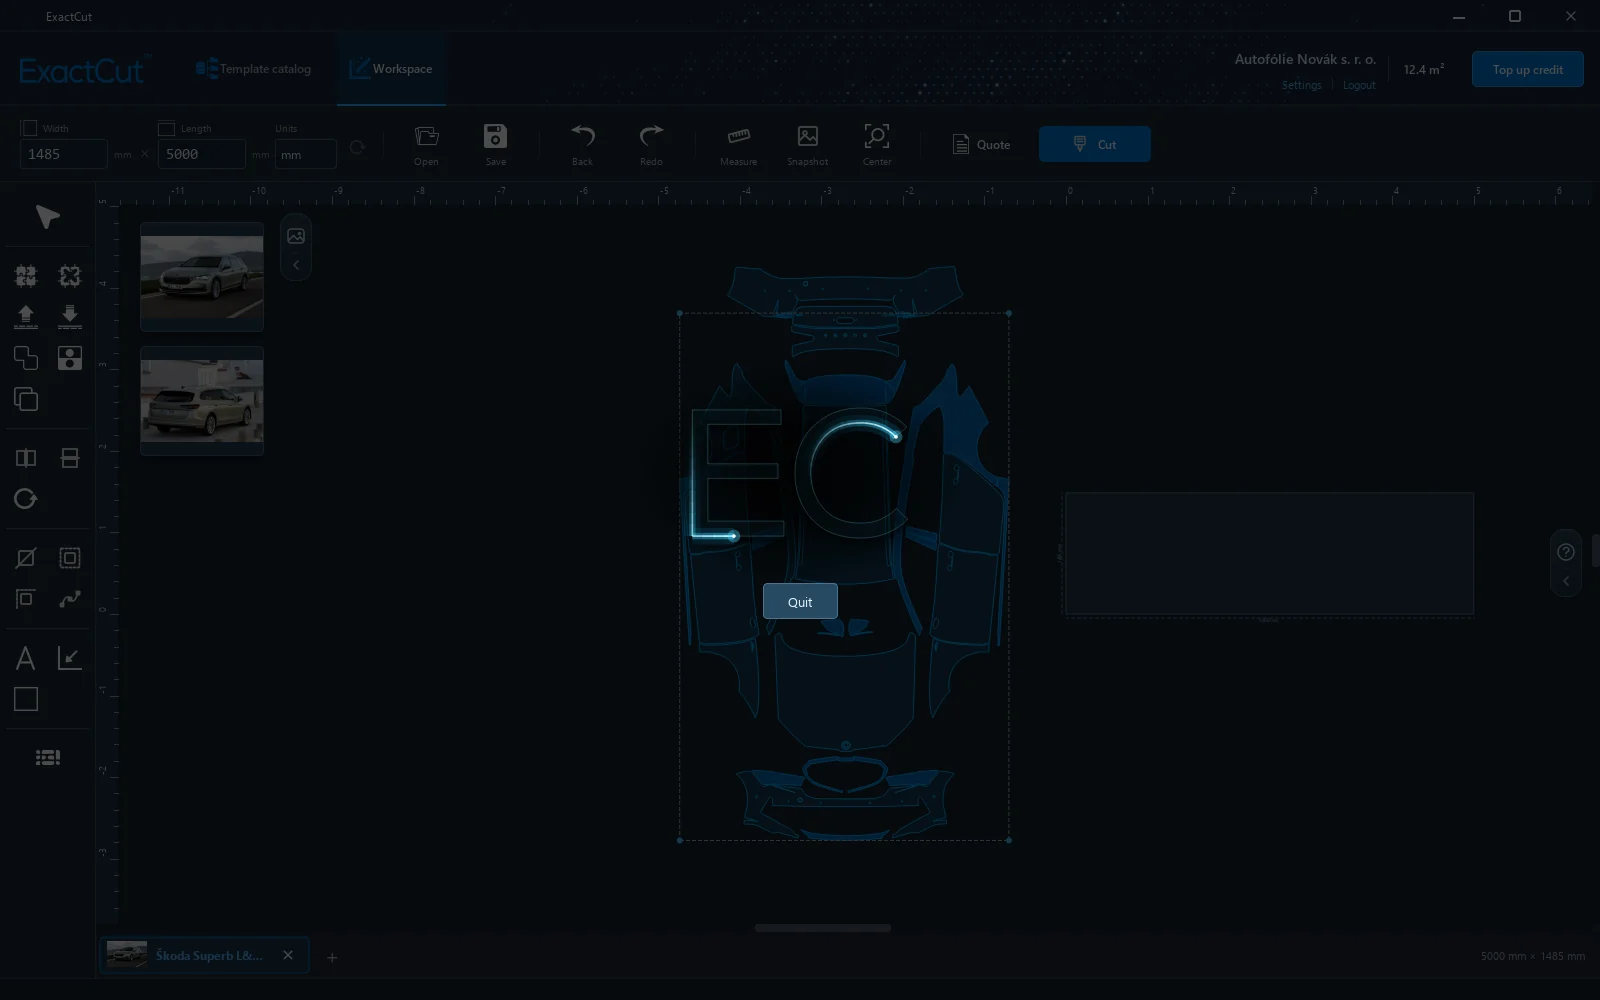
After you click Log in, a light runs around the edge of the window. It keeps running while the server checks the details and the program prepares the catalogue; the screen behind the window dims meanwhile. On a normal connection signing in takes a few seconds, then the main window opens with the template catalogue.
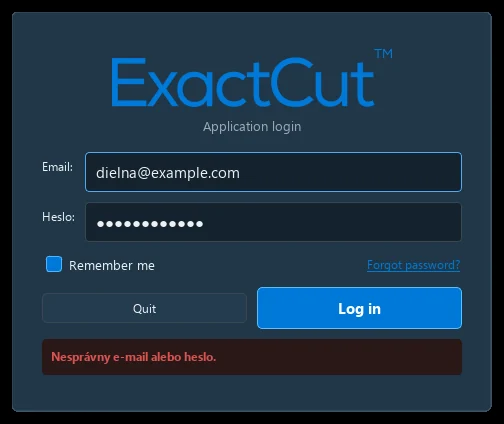
If the details are wrong, the program stops the light and prints the reason at the bottom of the window, for example Invalid e-mail or password. Correct the details and try again.
Forgotten password
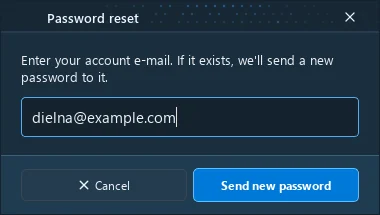
Click Forgot password?, enter the account e-mail and press Send new password. If the account exists, a new password arrives. For security the program never reveals whether the e-mail is on file. After five requests in a row the account is blocked for a while; if the e-mail does not arrive within a few minutes, check your spam folder or write to support.
Updates
Every time it starts, before signing in, the program checks whether a new version is on the server. The update is mandatory: an old version cannot sign in because it would not match the server.
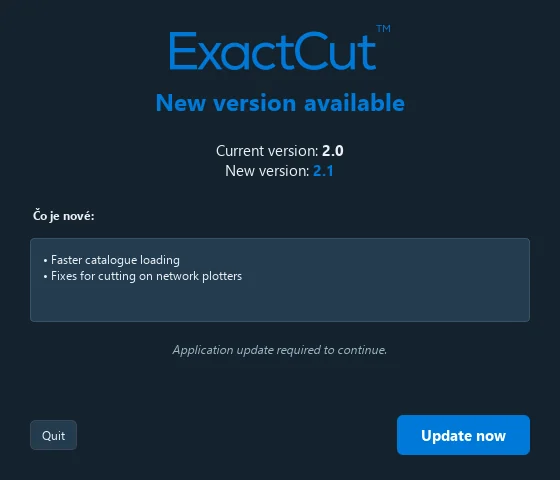
- Update now downloads only the changed files (usually a few MB), Windows asks for administrator consent, the program is assembled next to the old version and restarted. The old version keeps working until the new one is ready.
- Quit closes the program; the offer repeats at the next start.
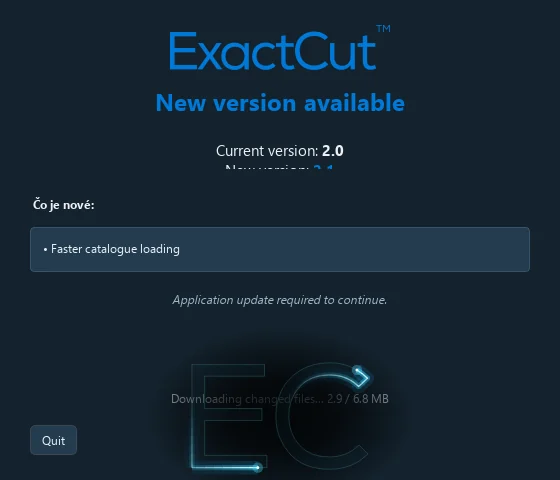
If the changed files cannot be downloaded, the program downloads the whole installer and installs it quietly by itself. If even that fails, it shows the window The update cannot be completed with Try again and Quit; the usual causes are a full disk, an antivirus or a firewall (chapter Troubleshooting). After a successful update a window with the list of changes appears once.
Signing out and quitting
- Logout in the window header signs you out and the program restarts into the sign-in window. Use it to switch to another account.
- Quit the program with the cross in the top right corner or with Ctrl+Q. The program asks Do you really want to close the program?; the default is No, so unfinished work is not closed by accident.
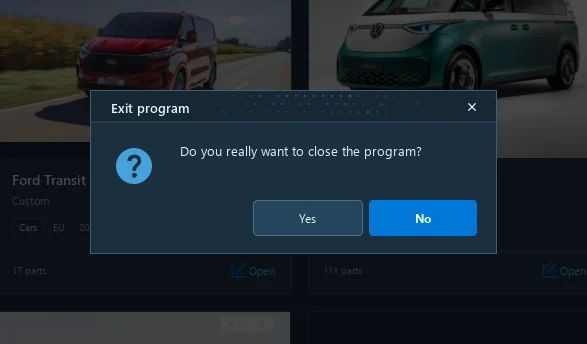
Tip: Save an unfinished workspace as a project before quitting (Ctrl+S). Projects live on the server, so you can open them on another computer too.
2 The program interface
The program has one main window with two views: Template catalogue and Workspace. Everything else (settings, account, credit top-up, cutting) opens in separate windows above it.
Main window
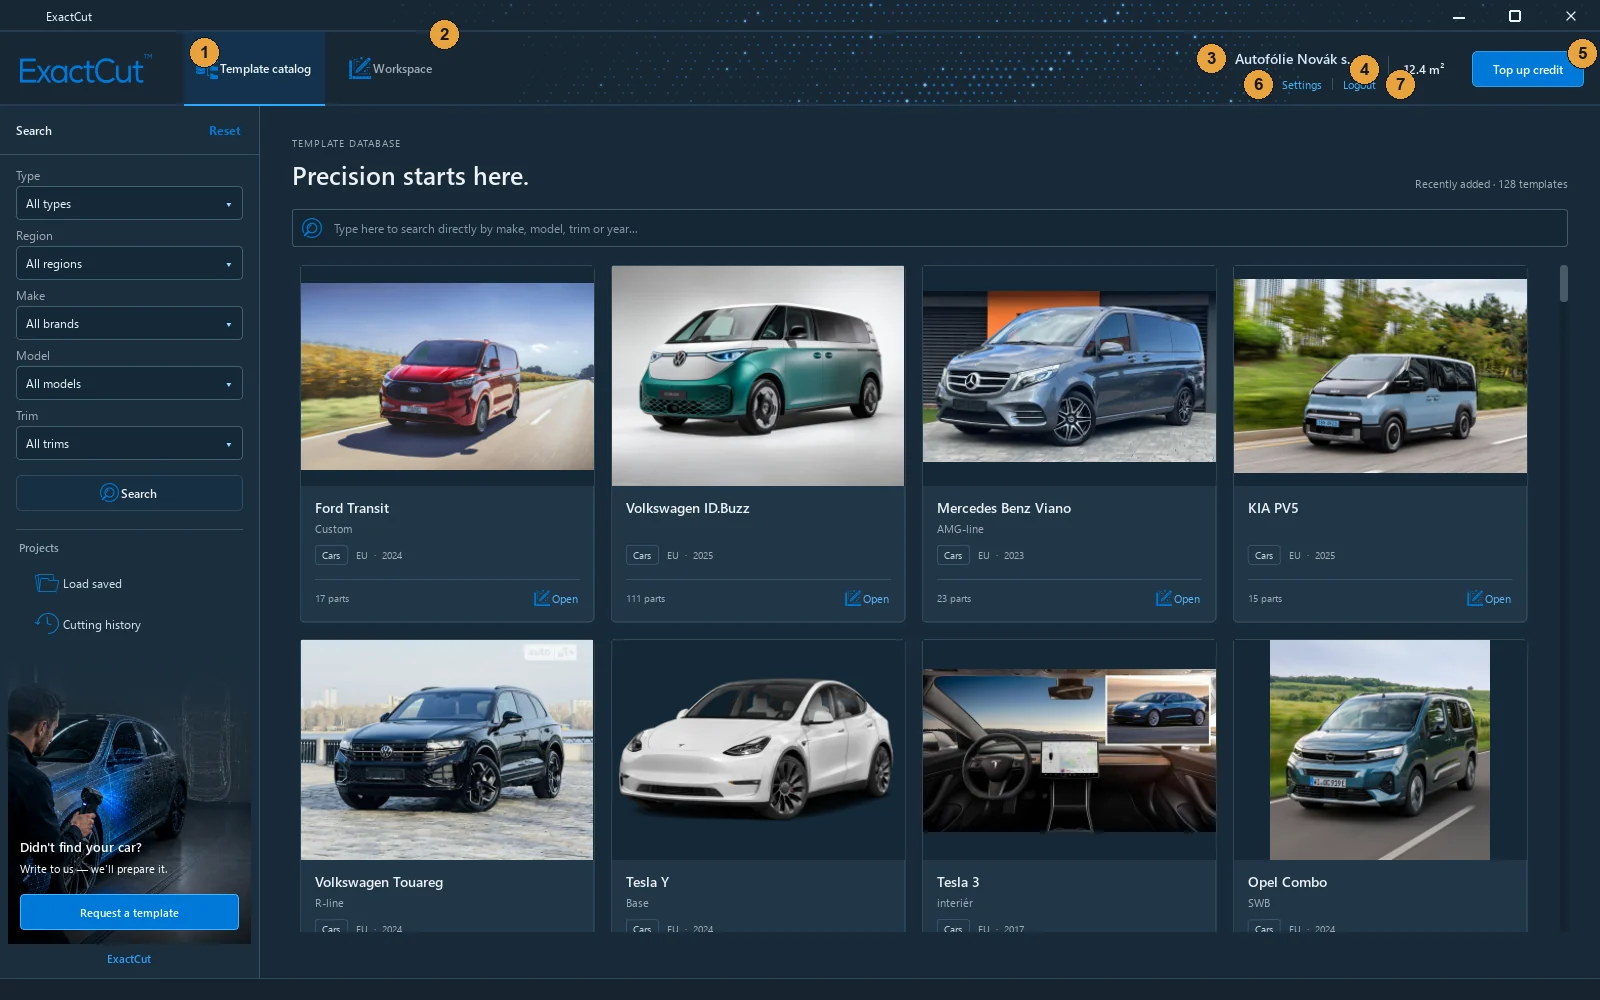
- Template catalog: the vehicle database from which templates are opened.
- Workspace: the film with the parts, editing tools and cutting.
- Your company name from the account (if not filled in, Company not specified).
- Credit in m². During a time plan the countdown N days left is shown below it.
- Top up credit opens the window with credit and cutting plans.
- Settings: display, devices, quotation and account.
- Logout.
The blue highlight in the header slides smoothly between the catalogue and the workspace according to where you are. You can switch between the views at any time; an open workspace stays as it is.

With an active cutting plan the credit is highlighted and the plan countdown runs below it:

Windows above the main window
Clicking Settings or Top up credit opens a separate window; the main window dims but stays in the background and nothing in it is lost. Close the window with Close or the cross.
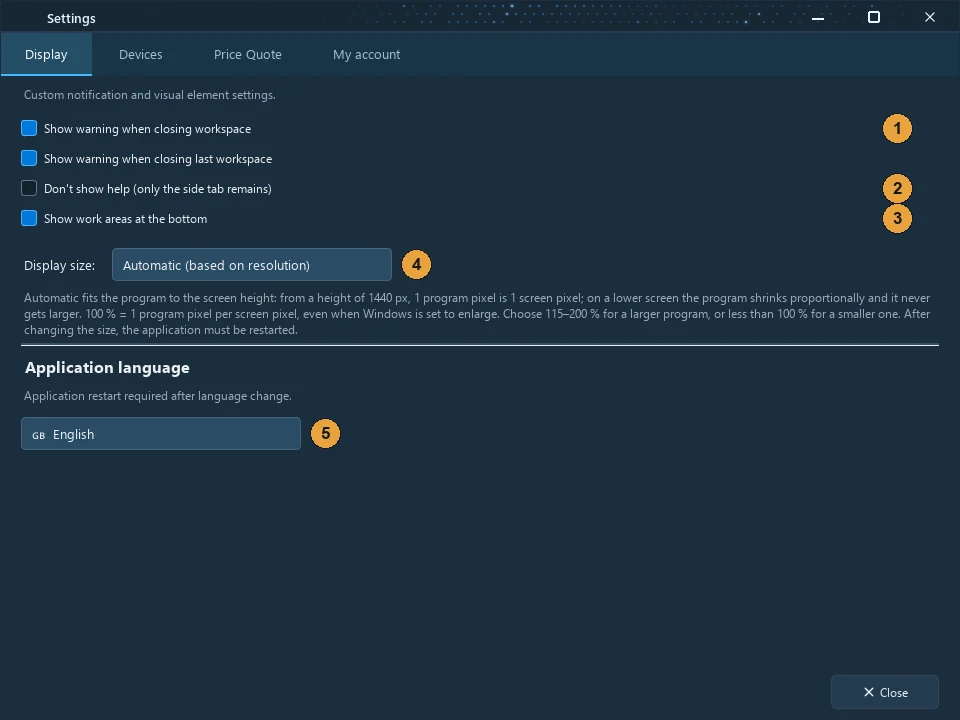
The Settings window has four tabs:
| Tab | What it contains |
|---|---|
| Display | Warnings when closing workspaces, help panel, placement of workspace tabs, display size, program language. |
| Devices | List of cutting plotters, adding and editing (chapter Cutting devices). |
| Price Quote | Supplier details, logo, currency and prices for the PDF quotation (chapter Account, credit and quotation). |
| My account | Profile, billing details, top-up history, invoices, cutting history, password change. |
Details of the Display tab are in the chapter Settings.
Messages
The program asks and reports in its own dark-styled windows. A question window always has a safe default answer (for example No when closing) and can be closed with Esc. Some questions offer Don't show again; only a positive answer is remembered and it can be restored in Settings → Display.
Short status messages (Downloading template…, Project saved) appear in the status bar at the bottom of the window.
3 Template catalogue
The catalogue is the database of vehicle cutting templates on the ExactCut server. Each template is a set of parts (hood, fenders, bumper, pillars…) ready for cutting. When you open it, the template is downloaded into the workspace, where you choose the parts, edit them, lay them out on the film and cut.
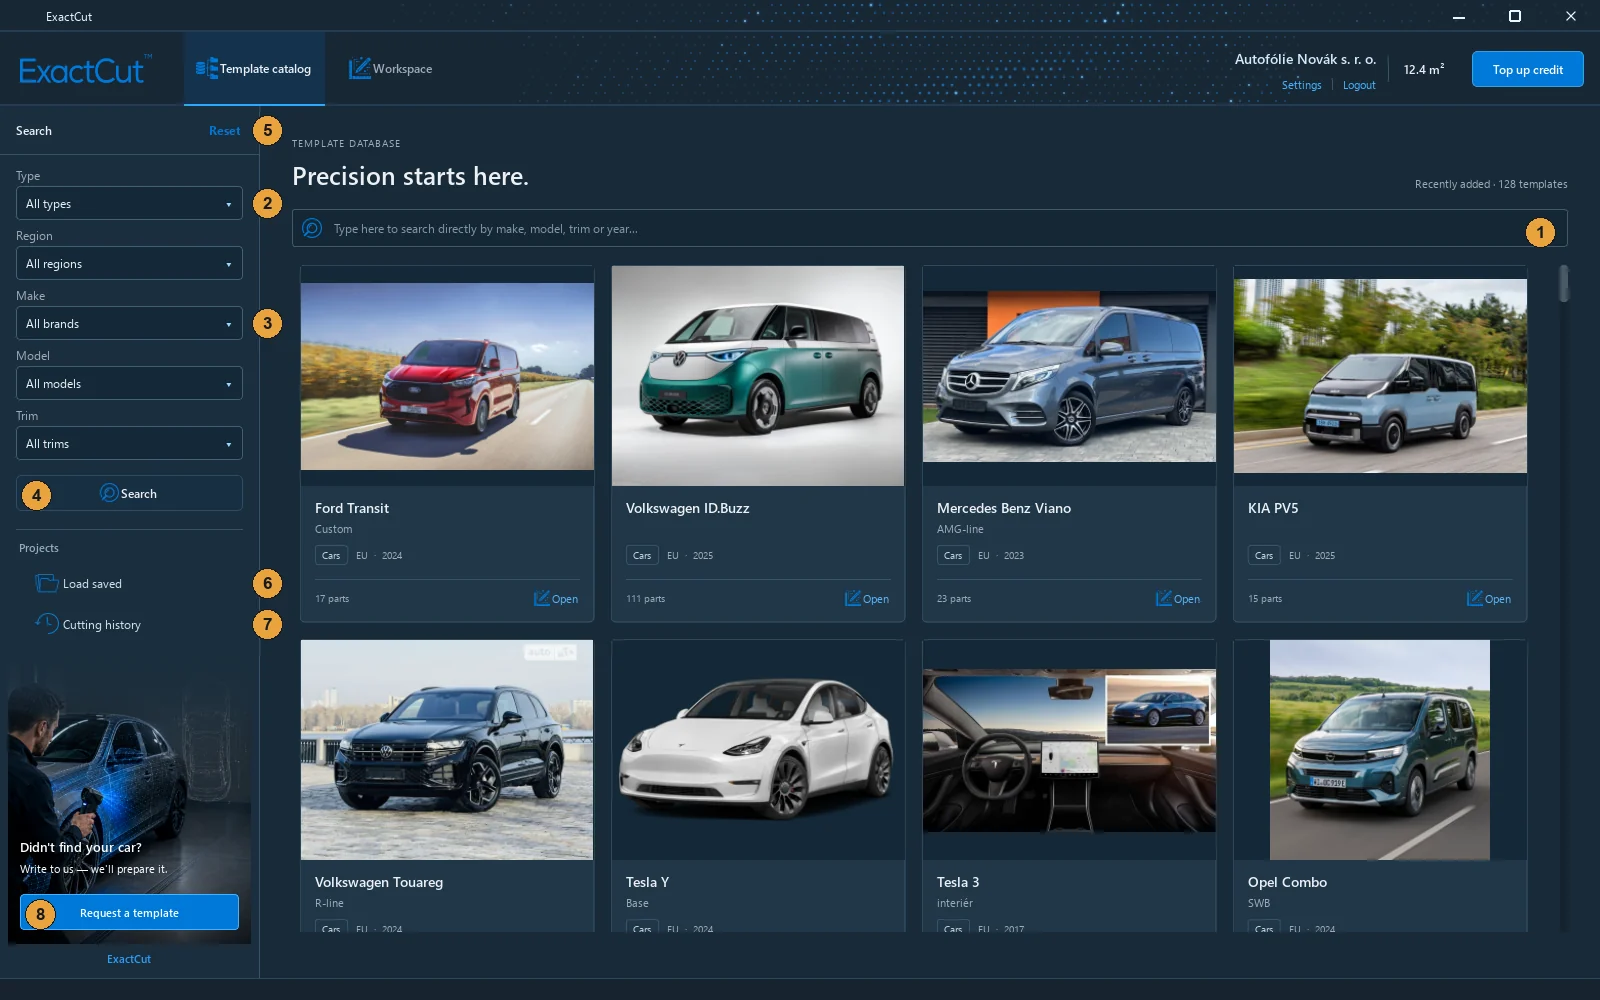
- Search: type a brand, model, trim or year; the results filter as you type.
- Template Type (Cars, Interiors, Motorcycles, Trucks, Tint).
- Make, Model and Trim filters; models and trims are offered after you pick a make.
- Search applies the chosen filters.
- Reset clears the filters and the text and returns the opening list.
- Load saved: your saved projects.
- Cutting history: what you have already cut.
- Request a template when a vehicle is missing from the catalogue.
After signing in, the catalogue shows the Recently added templates, newest first, with the total count. After a search the number N templates found is shown above the cards.
Searching
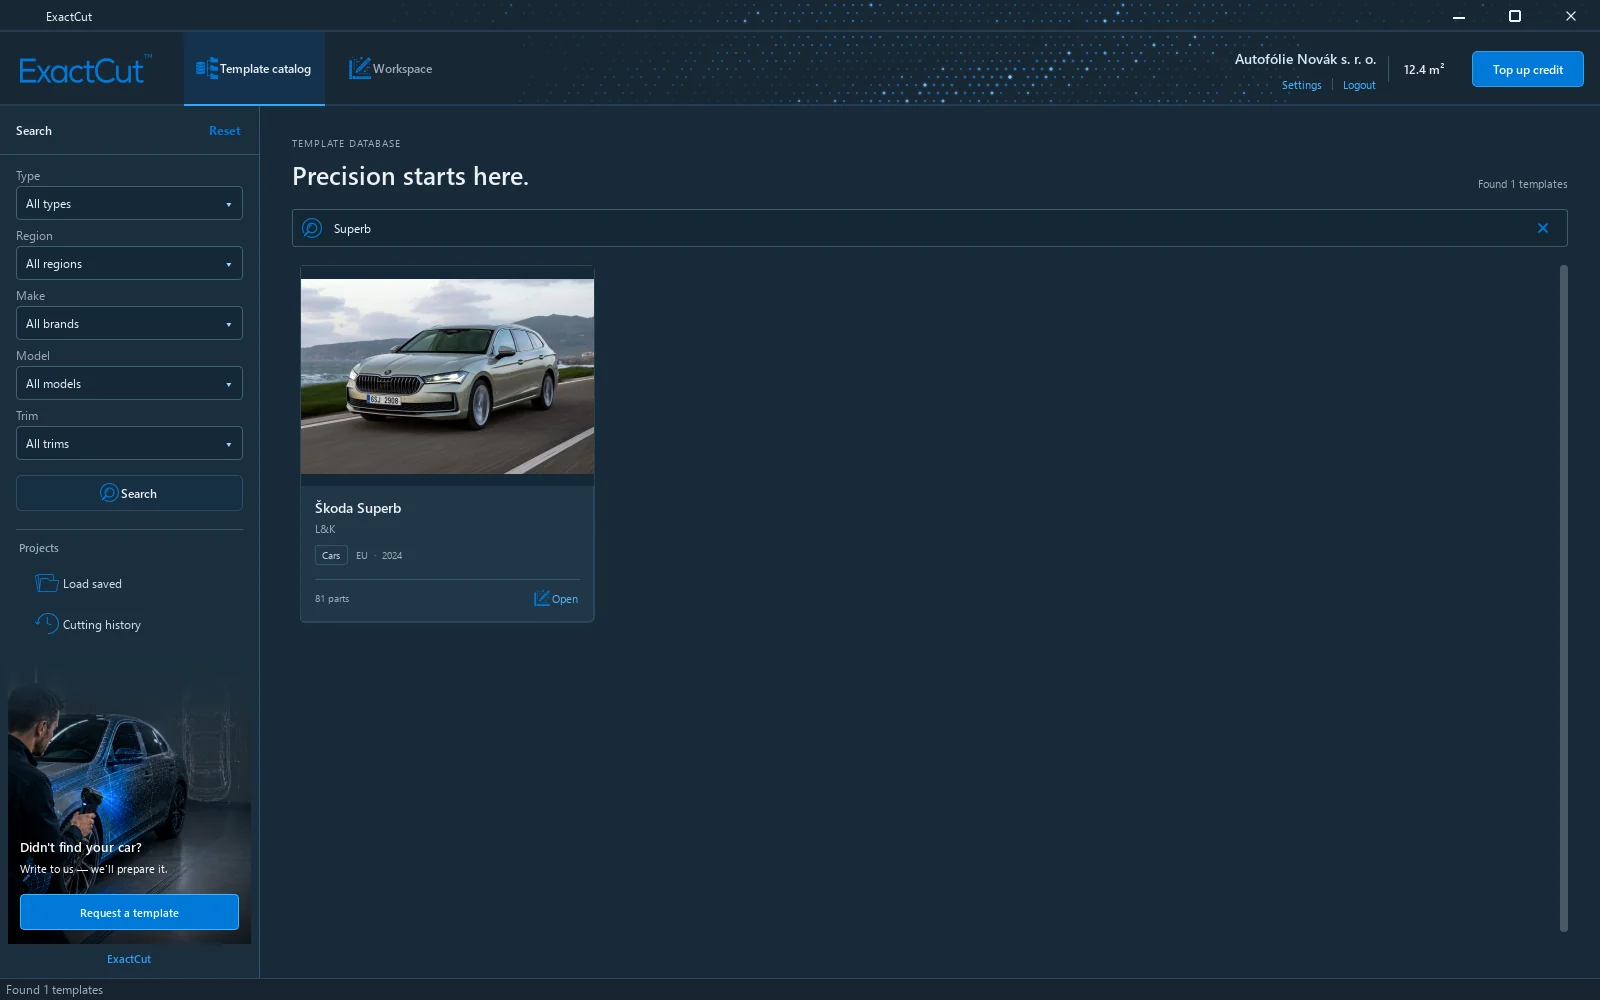
Just type part of a name into the search field, for example superb or kodiaq 2024. The search covers brand, model, trim and year, regardless of case and accents (skoda finds Škoda too). While the server answers, the magnifier in the field spins. The cross at the end of the field clears the text.
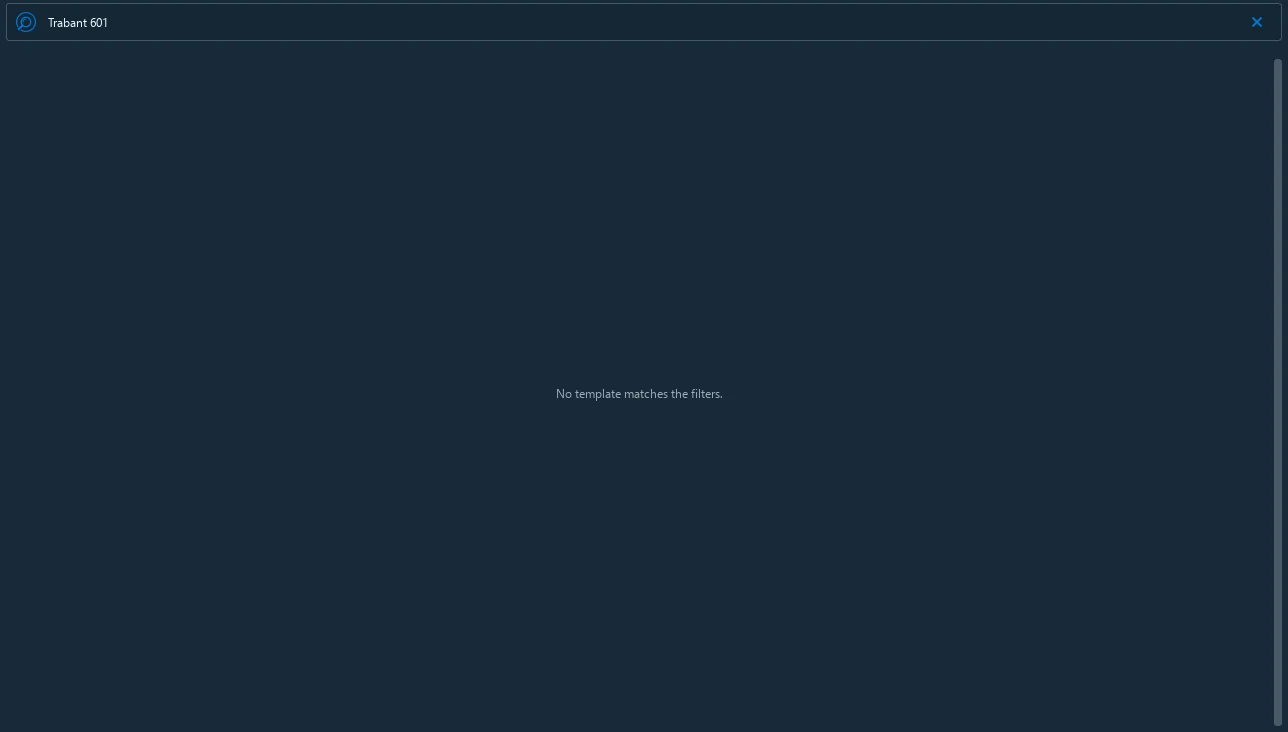
When nothing matches, the catalogue says so; check for a typo or try a shorter term.
Filters
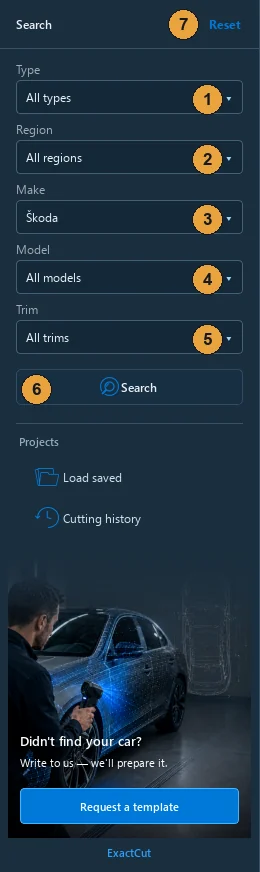
- Type: Cars, Interiors, Motorcycles, Trucks or Tint.
- Region: EU, USA, China, UAE, India. Vehicles differ by market in bumper shape and trim.
- Make.
- Model: loads after you pick a make.
- Trim: loads after you pick a model.
- Search applies the filters (text in the search field is combined with them).
- Reset clears everything and returns the opening list.
The lists are long, so they open as a short scrolling list; just type the first letters into it or scroll with the wheel.
Template card
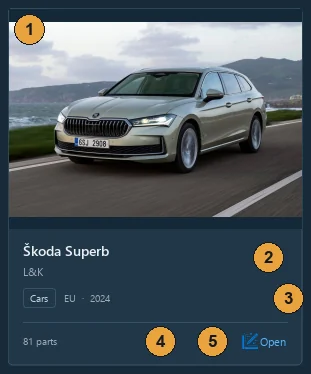
- Vehicle photo; click it to see it larger.
- Brand and model, with the trim below.
- Template type, region and year of manufacture.
- Number of parts in the template.
- Open the template in the workspace.
Opening a template
After you click Open, the card lights up around its edge and the program downloads the parts from the server. On a normal connection it takes a second or two, then the program switches to the workspace with a new tab named after the vehicle. The vehicle photos come with the template and are available in the gallery on the workspace.
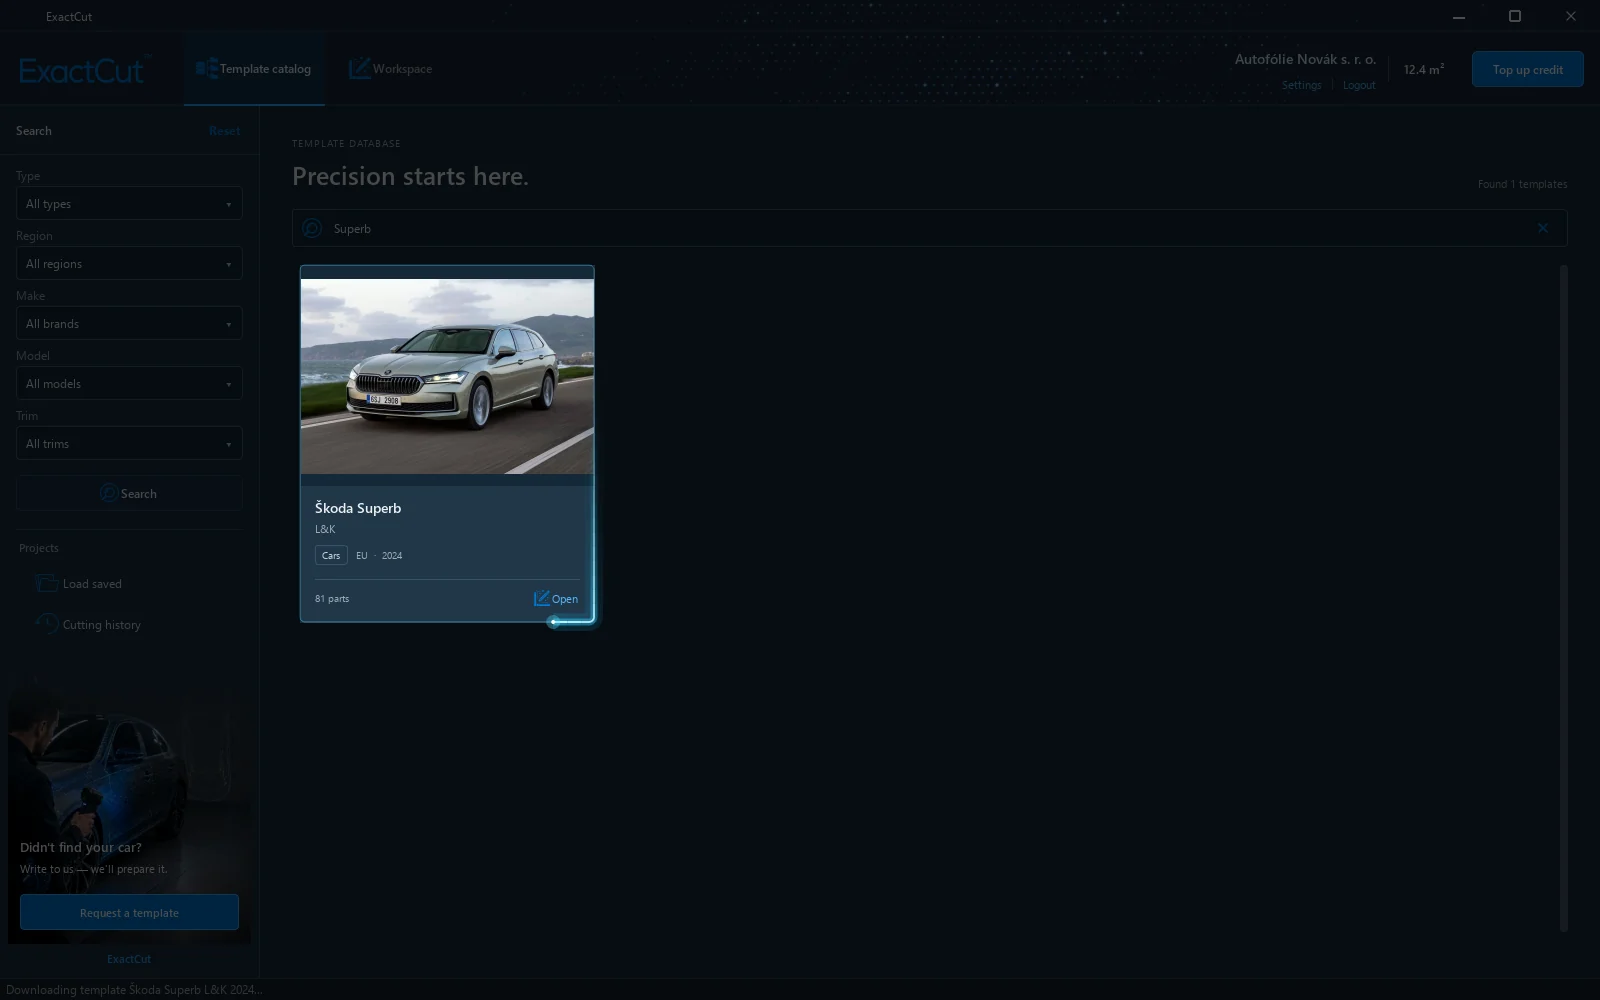
If the current workspace is empty, the template opens into it; otherwise it gets a new tab. The parts appear next to the film in the template's original layout; you get them onto the film with a selection and the Center tool or with auto-nesting (chapter Auto-nesting).
Note: Templates are intellectual property. After an unusually high number of openings in a short time the server pauses access to the database for an hour and the program says so.
Requesting a template
When a vehicle is not in the catalogue, click Request a template in the side panel. Fill in the brand, model, body type, trim and year, attach a photo of the vehicle (required, the template is prepared from it) and write in the text which parts you are interested in. We reply after you send it.

Saved projects
Save an unfinished workspace with the Save button on the workspace bar or with Ctrl+S; the first time you enter a project name. The project contains all parts and their position on the film and is stored on the server, so you can open it from another computer too.
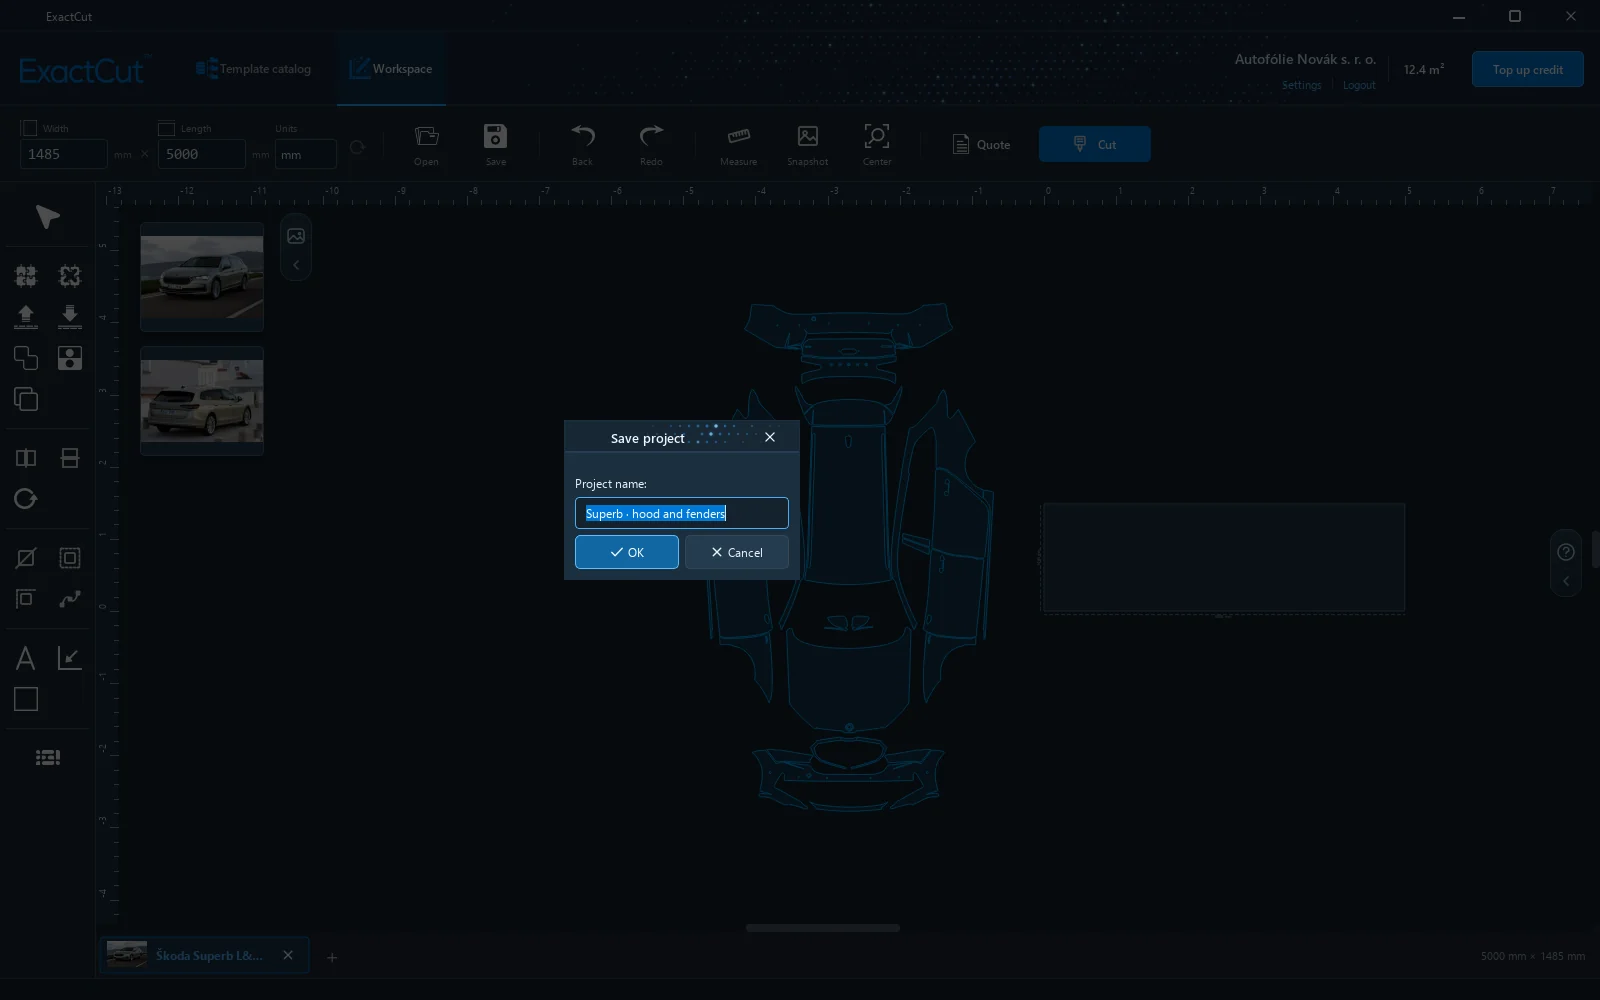
Load saved in the catalogue side panel (or Ctrl+O) opens the list of projects. You can search by name, Load opens the project in a new workspace, Delete removes it after confirmation.

Cutting history
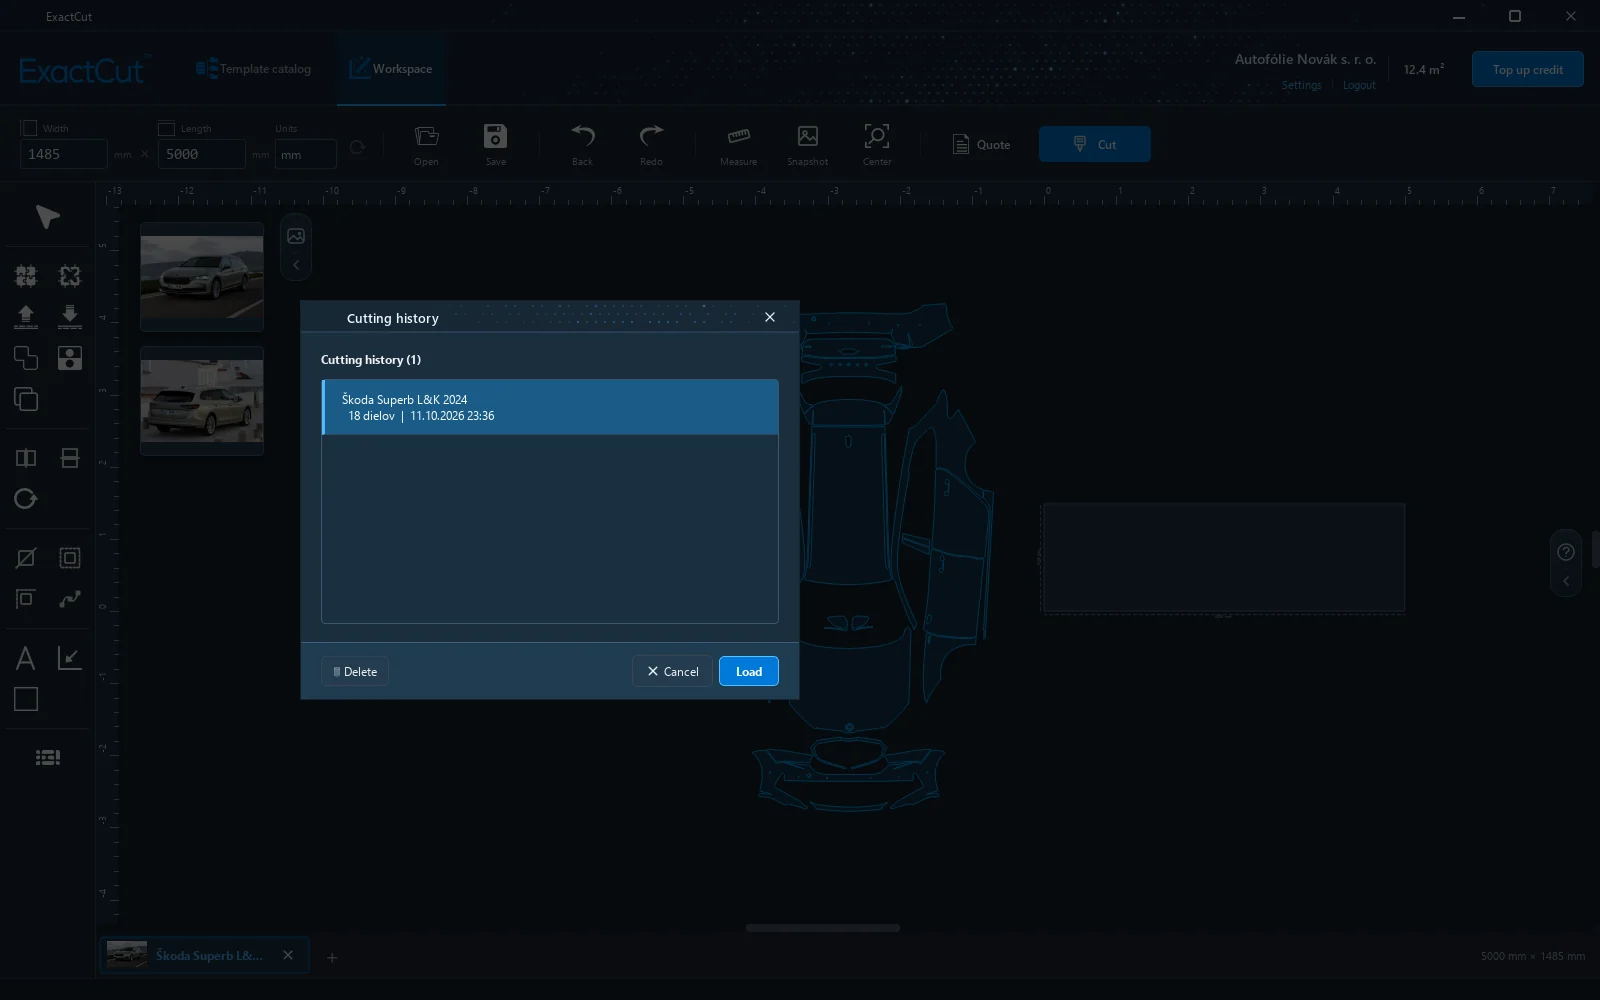
After every successful send to the plotter the program stores a record with the vehicle name, number of parts and area. Cutting history in the side panel shows the records; Load opens the layout exactly as it was cut, so it can be cut again.
4 Workspace and controls
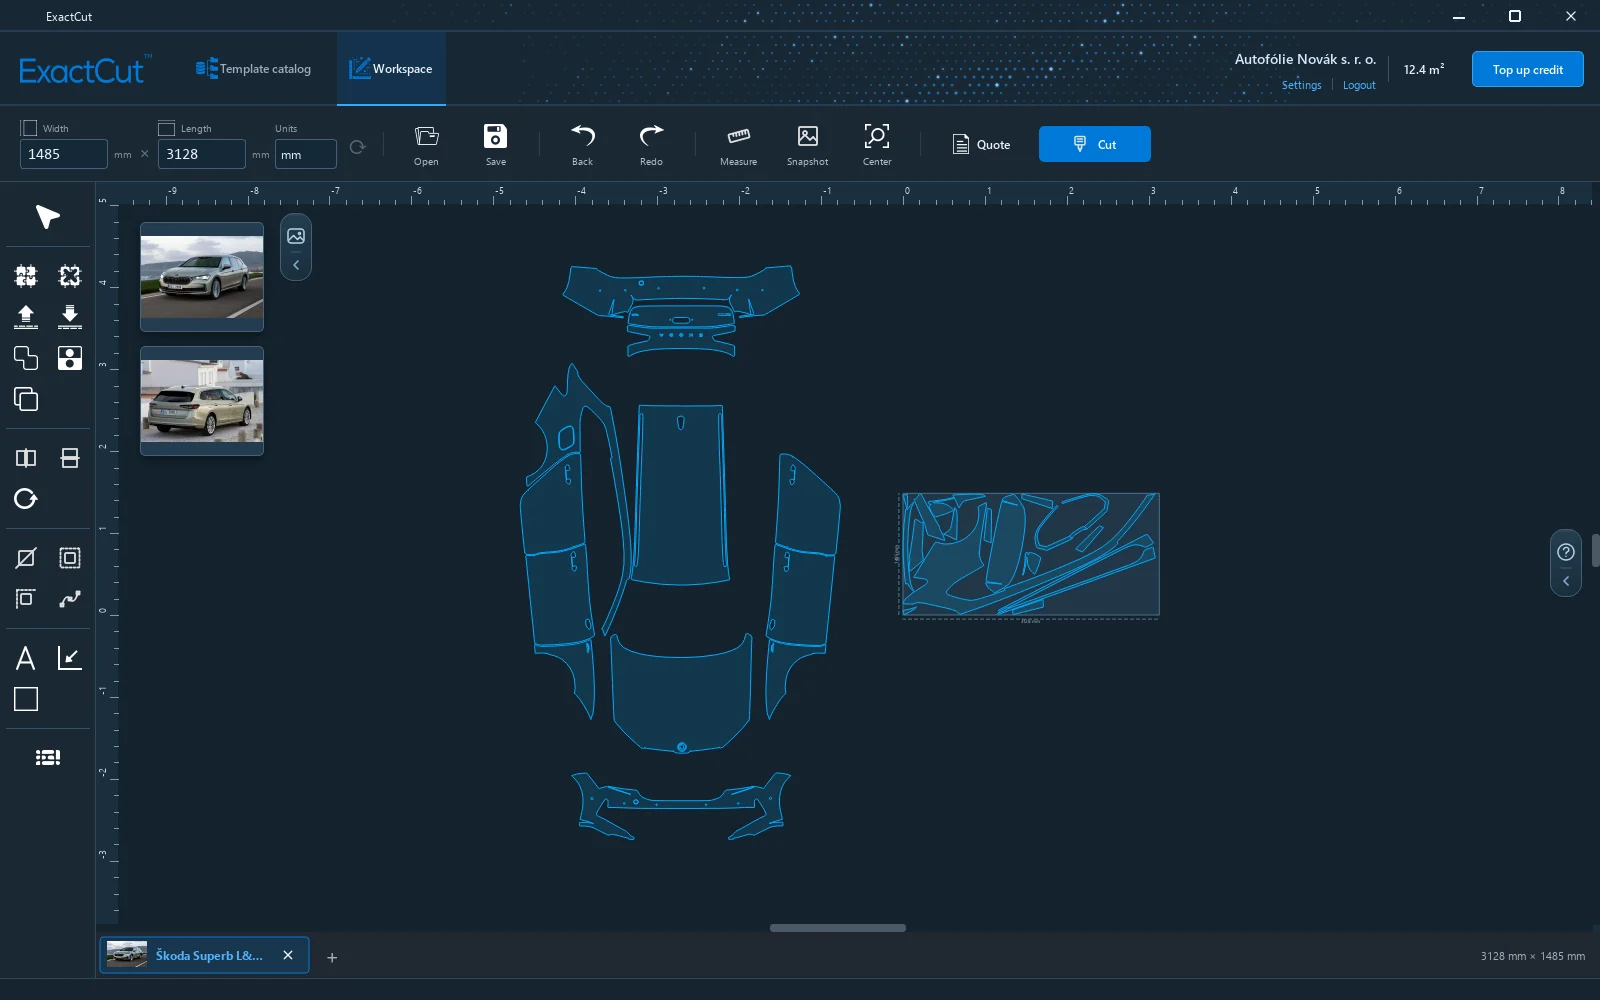
The workspace is the film in the cutting plotter seen from above. Parts lying on it are cut; whatever is outside is not. On the workspace you select, move, rotate and edit parts.
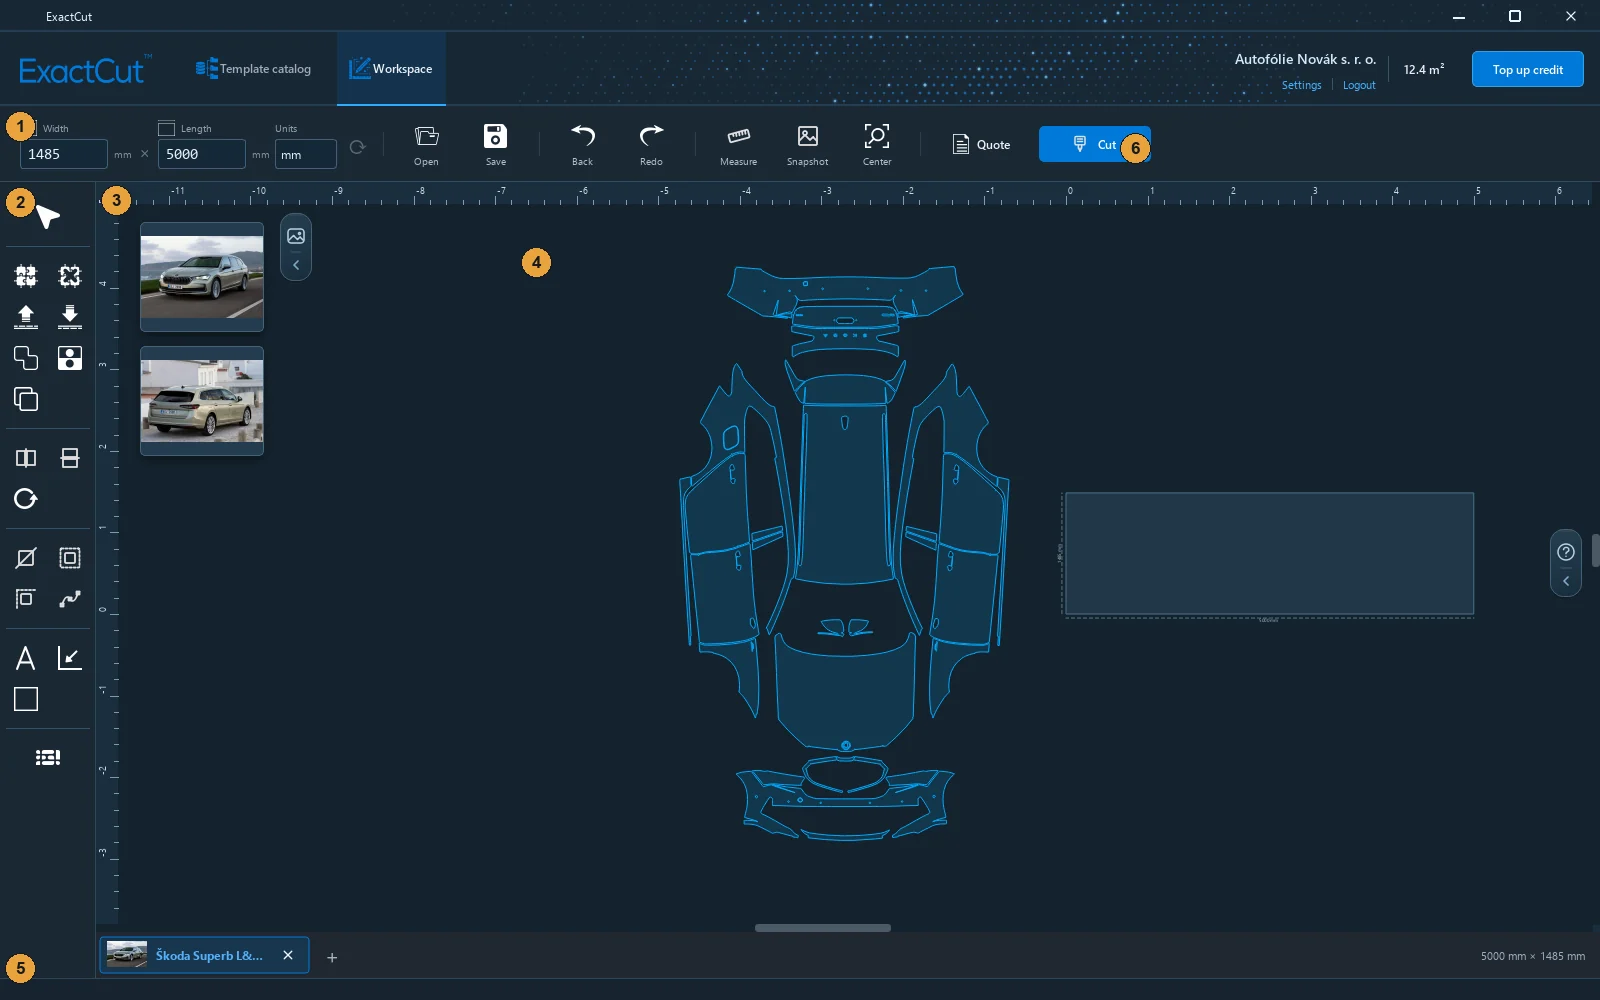
- Bar with the film size, units and commands (open, save, undo, measure, snapshot, centre).
- Tools in the left panel.
- Workspace tabs; each has its own film and parts.
- Canvas with rulers. The dark rectangle is the film, parts are blue outlines.
- Status bar with the film size and messages.
- Cut opens the cutting window (chapter Cutting).
Workspace bar

- Film Width in mm. Enter the width of your material and confirm with Enter.
- Film Length (length of the cutting area). Confirm with Enter.
- Units: mm or inches. Switches only the display; internally the program works in millimetres.
- Read the media width from the plotter. Works only with a plotter that communicates both ways; otherwise the button is grey and the tooltip explains why.
- Open a saved project.
- Save the project (Ctrl+S).
- Undo (Ctrl+Z).
- Redo (Ctrl+Y).
- Measure: distance between two points on the canvas.
- Snapshot: saves a picture of the workspace (PNG on white) to send to a customer.
- Center the view on the whole workspace.
- Ponuka: PDF quotation for the customer (chapter Account, credit and quotation).
- Cut.
Warning: The film width must match the material actually in the plotter and must not exceed the plotter width in its settings, otherwise the cut does not start.
Tools in the left panel

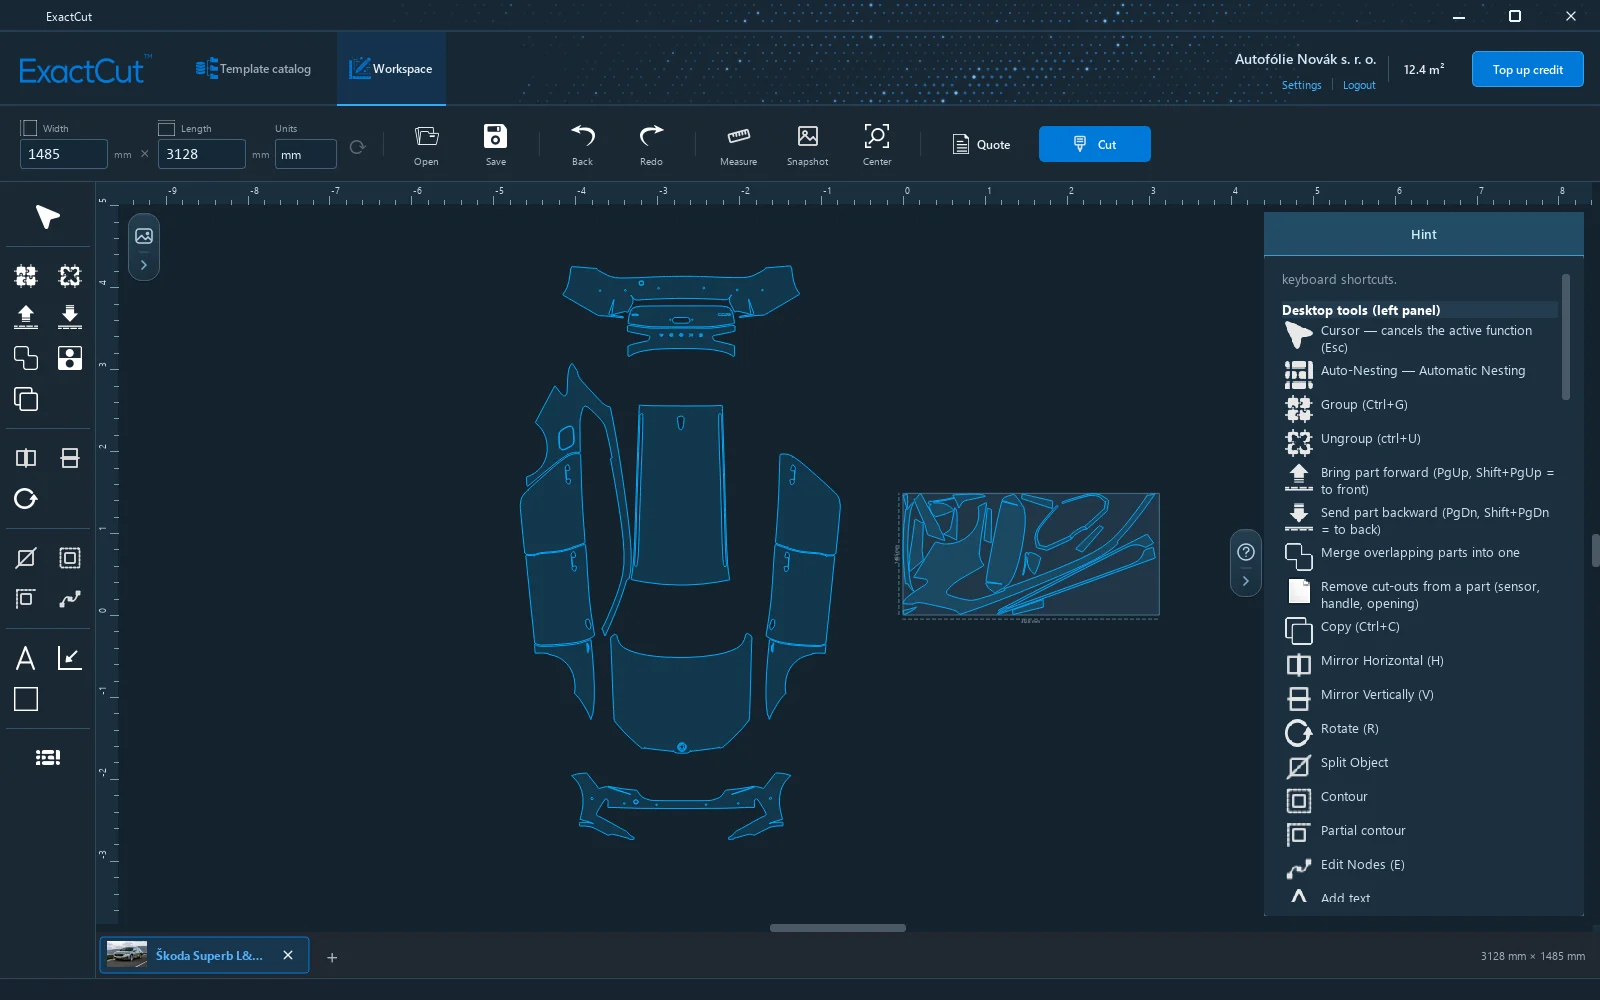
- Cursor: cancels the active function (Esc).
- Auto-nesting: automatic layout of parts on the film.
- Group (Ctrl+G): selected parts move together.
- Ungroup (Ctrl+U).
- Bring forward (PgUp, with Shift to the front).
- Send backward (PgDn, with Shift to the back).
- Merge overlapping parts into one.
- Remove cut-outs from a part (sensor, handle, opening).
- Copy (Ctrl+C); paste with Ctrl+V where you click.
- Mirror horizontally (H), for example for the other side of the vehicle.
- Mirror vertically (V).
- Rotate (R): by a fixed or a custom angle.
- Split a part with a line into two.
- Contour of the whole part: outward or inward offset of the outline.
- Partial contour: offset only on a chosen section of the outline.
- Edit nodes (E): curve point editor.
- Text on the workspace (not cut, for labelling).
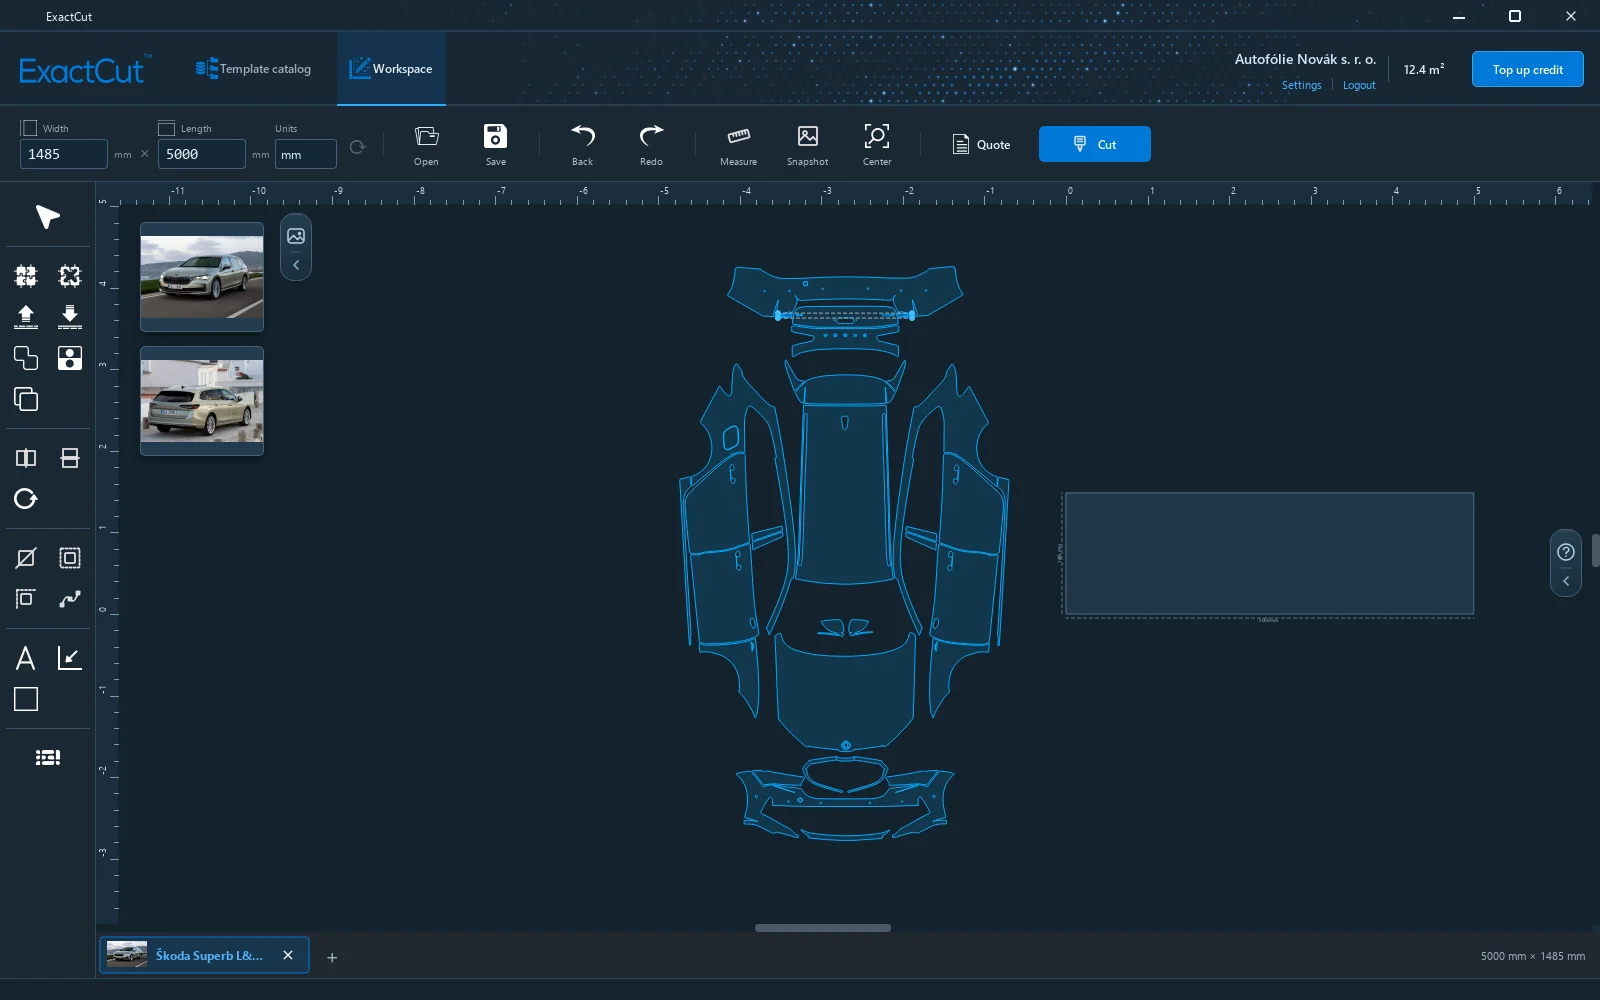
- Center selection (P): selected parts to the middle of the film vertically and to its start (10 mm from zero).
- Shapes: rectangle, ellipse, triangle.
Details of each tool are in the chapter Editing parts.
Mouse
| Gesture | What it does |
|---|---|
| Left button on a part | Selects the part. Dragging moves it. |
| Left button on empty space and drag | Rubber-band selection. Parts touched by the rectangle are selected. |
| Alt + drag a rectangle | Only parts entirely inside the rectangle are selected. |
| Ctrl + click | Adds a part to the selection or removes it. |
| Ctrl+Alt + click | Selects a part lying under another part. |
| Double-click a selected part | Switches the handles between move and rotate. |
| Shift while dragging | Movement only horizontally or vertically. |
| Ctrl while rotating | Rotation in 45° steps. |
| Wheel | Zoom in and out towards the cursor. |
| Middle button (wheel) and drag | Pan the view. |
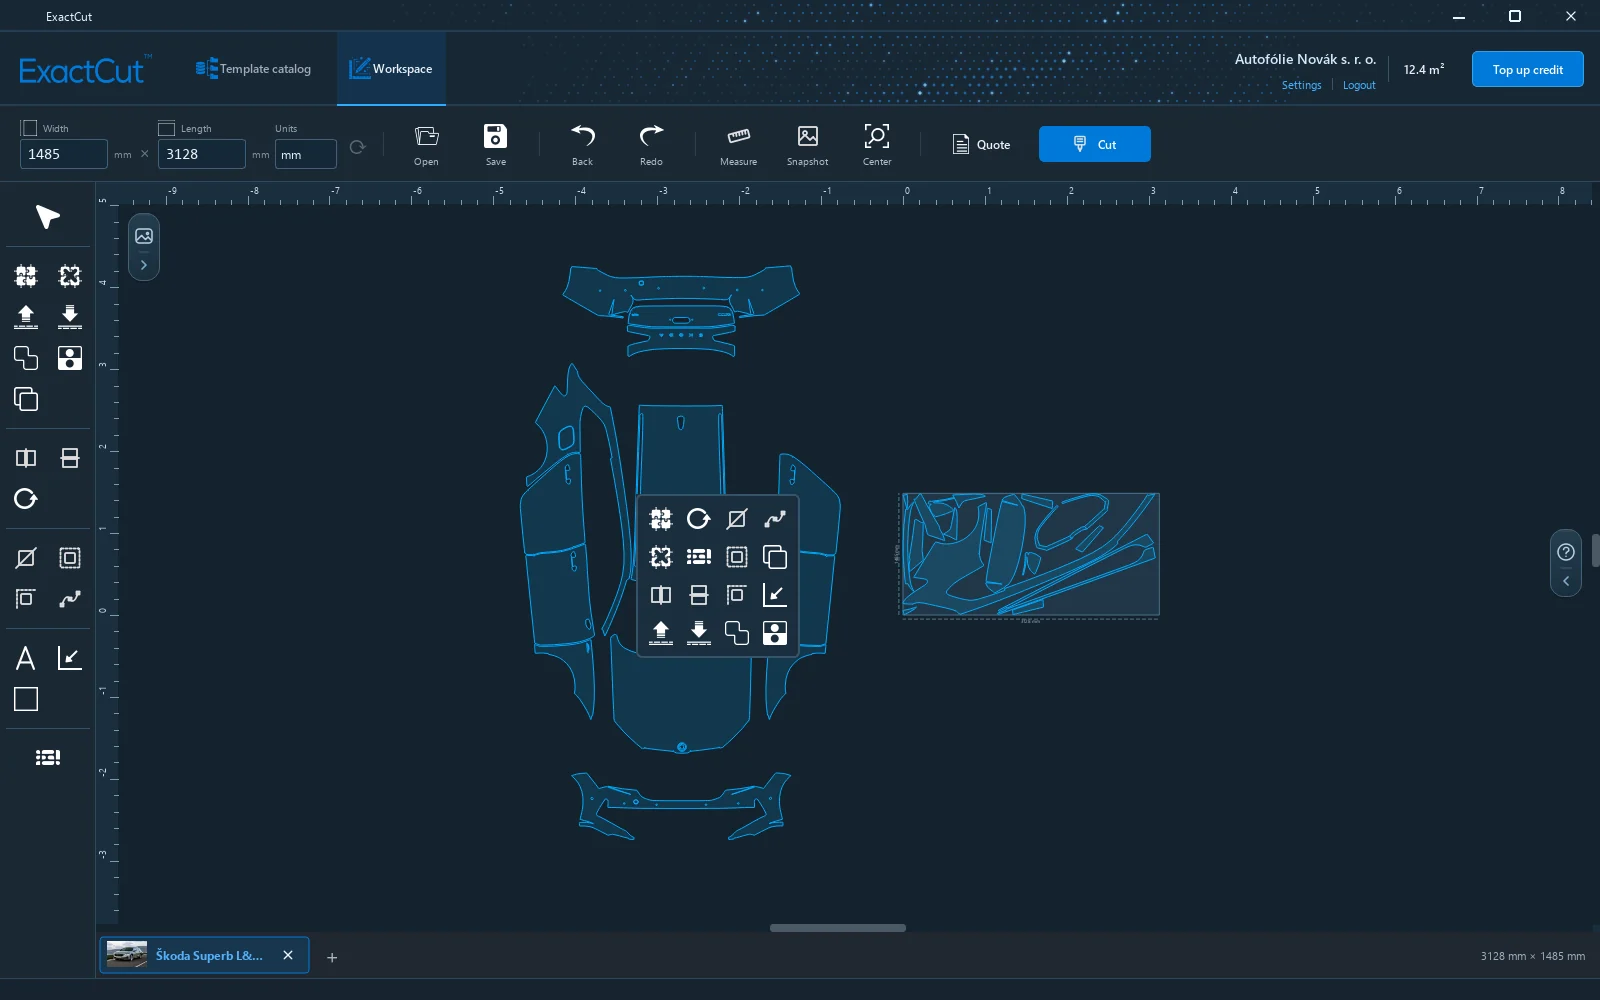
| Right button | Quick menu with tools at the cursor. |
Selected parts have handles at the corners; the centre of the selection and the area of the parts in m² are in the status bar.
Keyboard shortcuts
| Keys | Function |
|---|---|
| Ctrl+S / Ctrl+Shift+S | Save project / Save as |
| Ctrl+O | Load a saved project |
| Ctrl+Z / Ctrl+Y | Undo / Redo |
| Ctrl+A | Select all |
| Ctrl+C / Ctrl+X / Ctrl+V | Copy / Cut / Paste |
| Delete or Backspace | Delete selected parts |
| Ctrl+G / Ctrl+U | Group / Ungroup |
| PgUp / PgDn | Part forward / backward (with Shift all the way) |
| H / V | Mirror horizontally / vertically |
| R | Rotate |
| E | Edit nodes |
| P | Center the selection on the film |
| Enter | Confirm the open tool |
| Esc | Cancel the tool or the selection |
| Ctrl+Q | Quit the program |
Film and collisions
Only parts lying entirely on the film are cut. The program shows this with colour:
- a blue part on the film is fine and will be cut;
- a red part crosses the film edge or overlaps another part; the cut would be wrong, so move it;
- a part entirely outside the film is "parked": it stays blue, is not cut and serves as a holding area for parts that go on the next film.
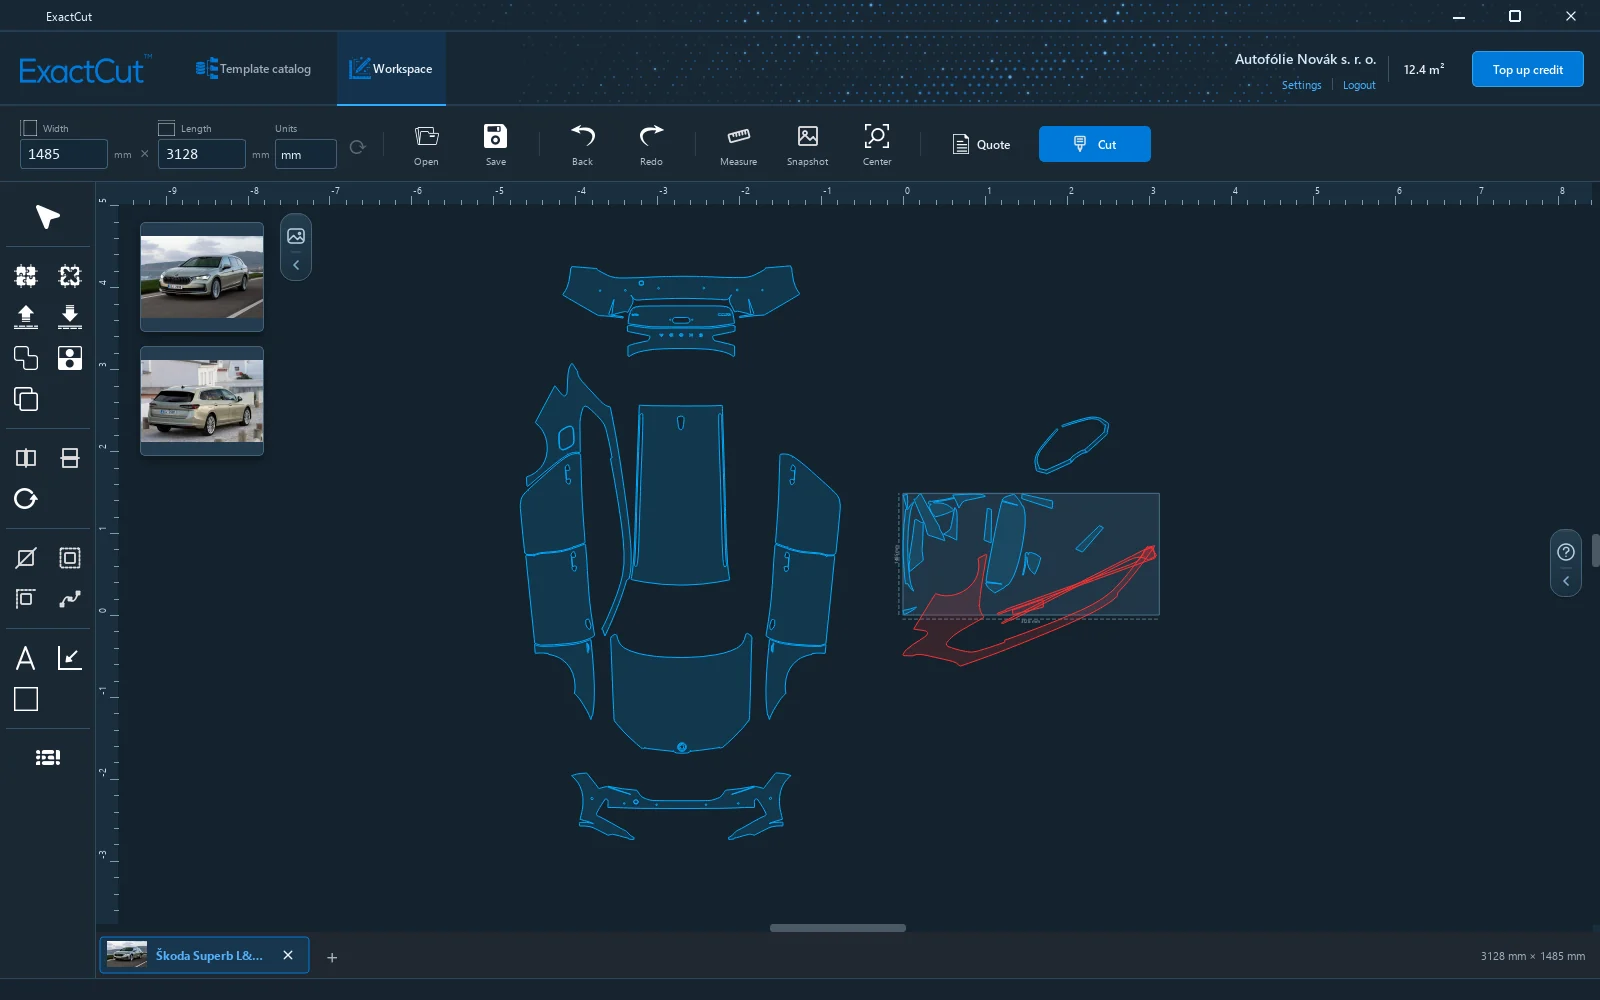
Collision checking runs continuously with every move.
Several workspaces
Every template or project gets its own tab. The + button adds an empty workspace, the cross closes a tab (if it has parts, the program asks). The tabs are below the canvas by default; in Settings → Display they can be moved above it.

Photo gallery
Above the canvas on the left is a slide-out panel with the vehicle photos from the template. Click a photo to see it larger; the arrow folds the panel.
Help panel
On the right is a tab with a question mark. When unfolded it shows an overview of tools, part operations and keyboard shortcuts; with the Split and Edit nodes tools the content changes according to what you are doing. In Settings → Display the help can be hidden so that only the side tab remains.
5 Editing parts
Parts from a template can be edited before cutting: enlarged by an offset, split, mirrored for the other side of the vehicle, cleaned of cut-outs or fine-tuned point by point. The tools are in the left panel and in the quick menu under the right mouse button.
A tool that needs settings opens a palette above the canvas. The palette can be dragged by its header, and the Collapse button shrinks it to a row of buttons. Confirm (or Enter) applies the change, Cancel (or Esc) discards it. While a palette is open, no other tool can start; the status bar reminds you to finish the current function first.
Every edit is a step that Undo (Ctrl+Z) reverts.
Groups and order
- Group (Ctrl+G) joins the selected parts into a group that moves and rotates as a whole. Useful for parts that should stay together on the film. Ungroup (Ctrl+U) separates them again.
- Bring forward and Send backward change the order of overlapping parts so that you can grab the one lying under another. Ctrl+Alt + click selects the lower part even without changing the order.
- Merge joins overlapping parts into one outline. Use it when two parts are cut as one piece (for example a fender with its lip).
- Copy (Ctrl+C) and Paste (Ctrl+V): after pasting, the copy follows the cursor and a click places it. Ctrl+X cuts the part out and pastes it in a new place.
Mirroring and rotating
- Mirror horizontally (H) and Mirror vertically (V) flip the selected parts. Mirroring the left door gives the right one; templates therefore often contain only one side of the vehicle.
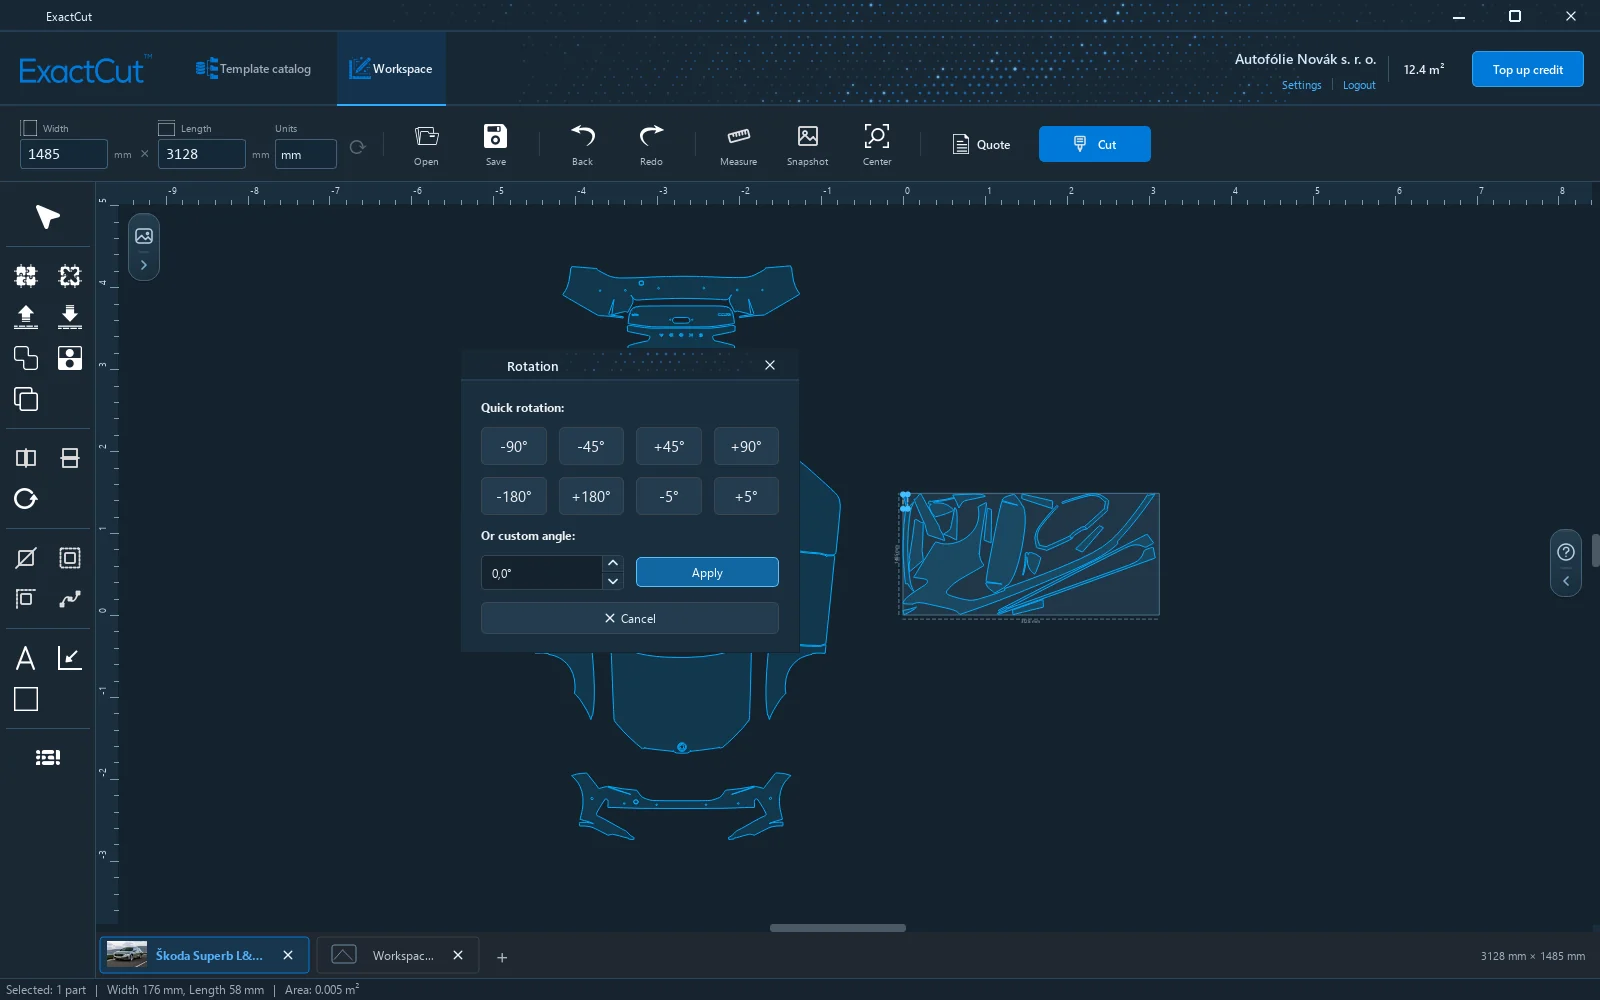
- Rotate (R) offers quick angles of ±45°, ±90°, ±180° and ±5° or a custom angle. You can also rotate directly on the canvas: double-click a selected part to switch the handles to rotation; Ctrl while dragging steps by 45°.
Tip: Mirroring in the tool is a different thing from Mirror X / Y in the plotter settings. Here you mirror a part (the other side of the vehicle); in the plotter you mirror the direction of the cut on the machine.
Split
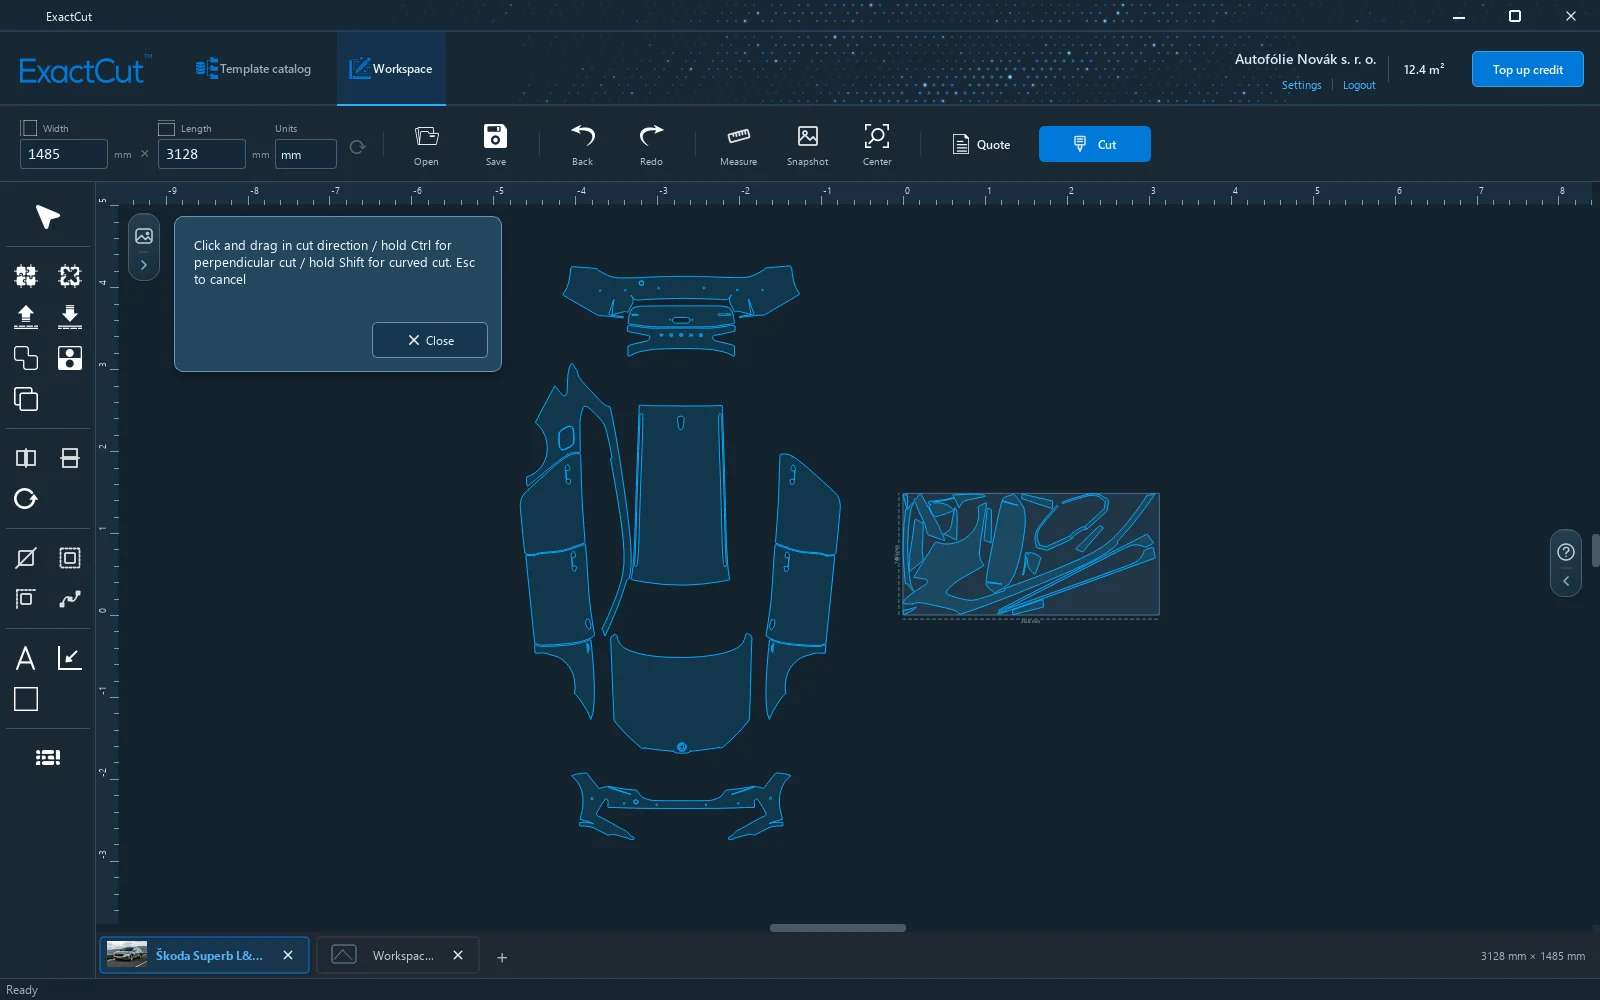
Split cuts a part with a line into two. After switching it on, click the part and drag in the direction of the cut; with Ctrl held the cut is perpendicular, with Shift curved. Esc ends the tool. Use it for parts larger than the film width or to split a hood into two halves.
Contour (offset)
Contour enlarges or shrinks the outline of a part by a given value. Switch the tool on and move the mouse to an outline: the outline that will get the contour lights up purple. At the outer edge the whole perimeter of the part lights up, at a hole only that hole. Click to select it (a click inside the part selects its perimeter) and a purple preview shows the result. If the part was selected before switching the tool on, the preview appears straight away. Set in the palette:
- Contour direction: Outer (offset outwards) or Inner (shrink).
- Offset in mm, 10 mm by default, with the slider or a number (0 to 100 mm). The preview follows the value.
- Apply writes the contour into the part and lets you pick the next outline, Refresh cancels the current selection, Confirm saves all edits at once (one Undo step).
A contour on the perimeter changes only the outer edge of the part; holes stay as they are.
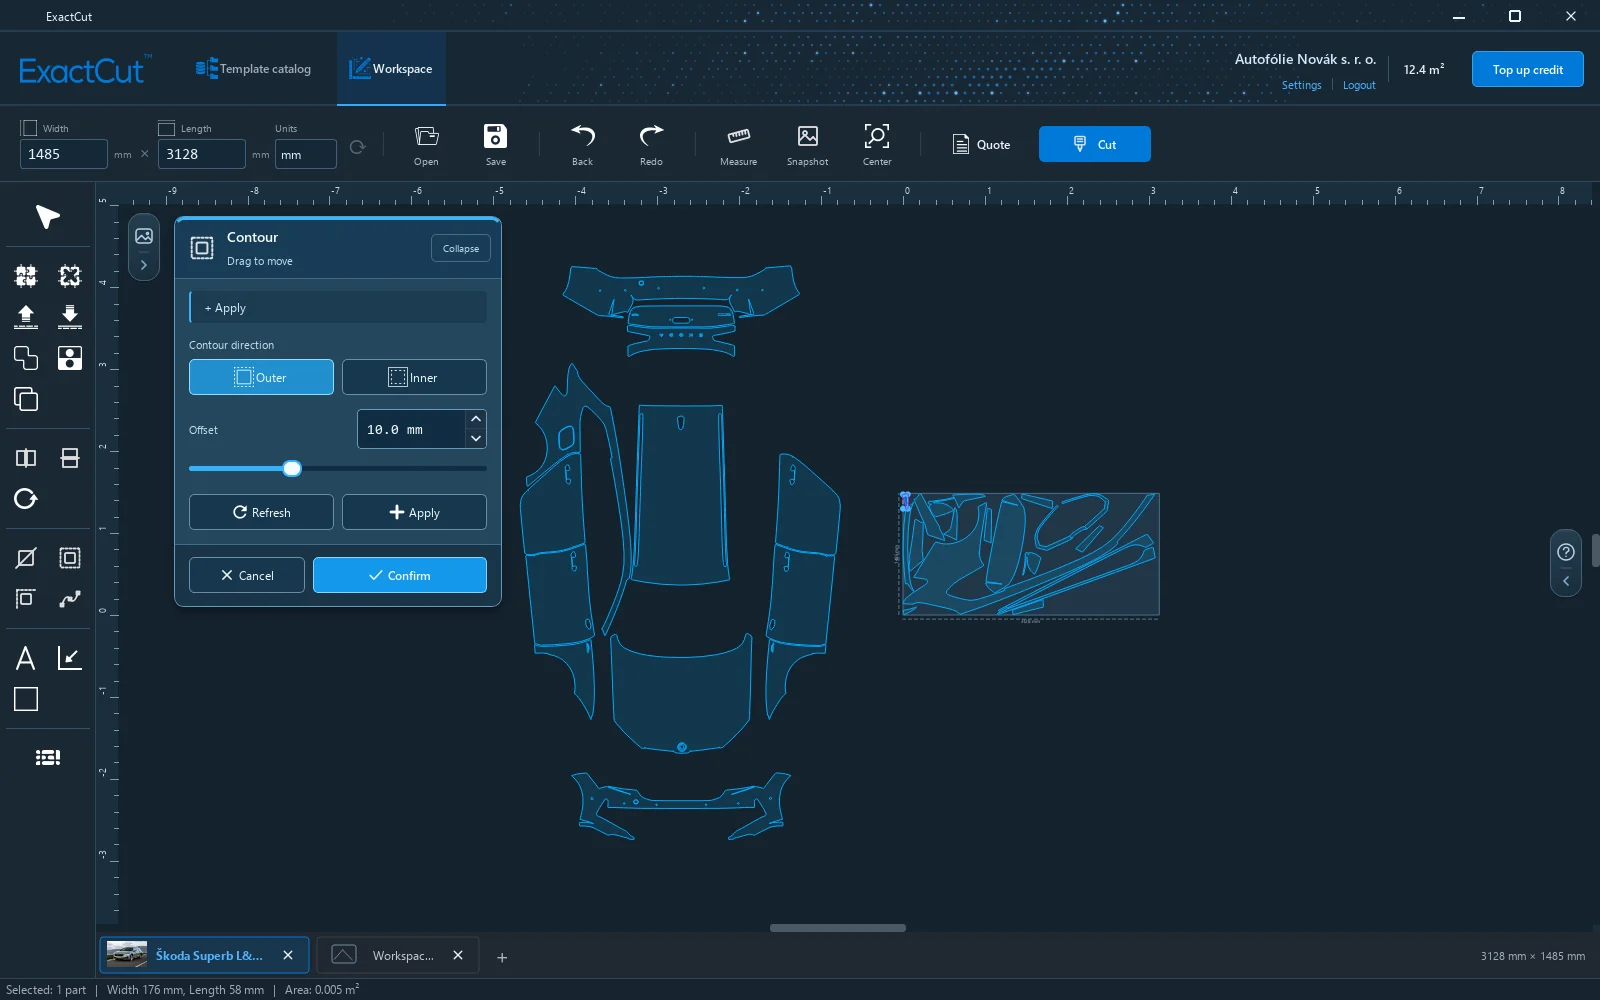
Offset on a hole (sensor, fog-light or grille opening): point at the edge of the hole and click it. The Outer contour moves the film into the hole, so the hole gets smaller and the film can be wrapped over its edge. Inner makes the hole larger. If the offset is larger than the hole, the program reports The overhang is larger than the hole — the hole would disappear. and the hole stays as it was. The perimeter and the holes of one part can be edited one after another: after Apply, pick the next outline.
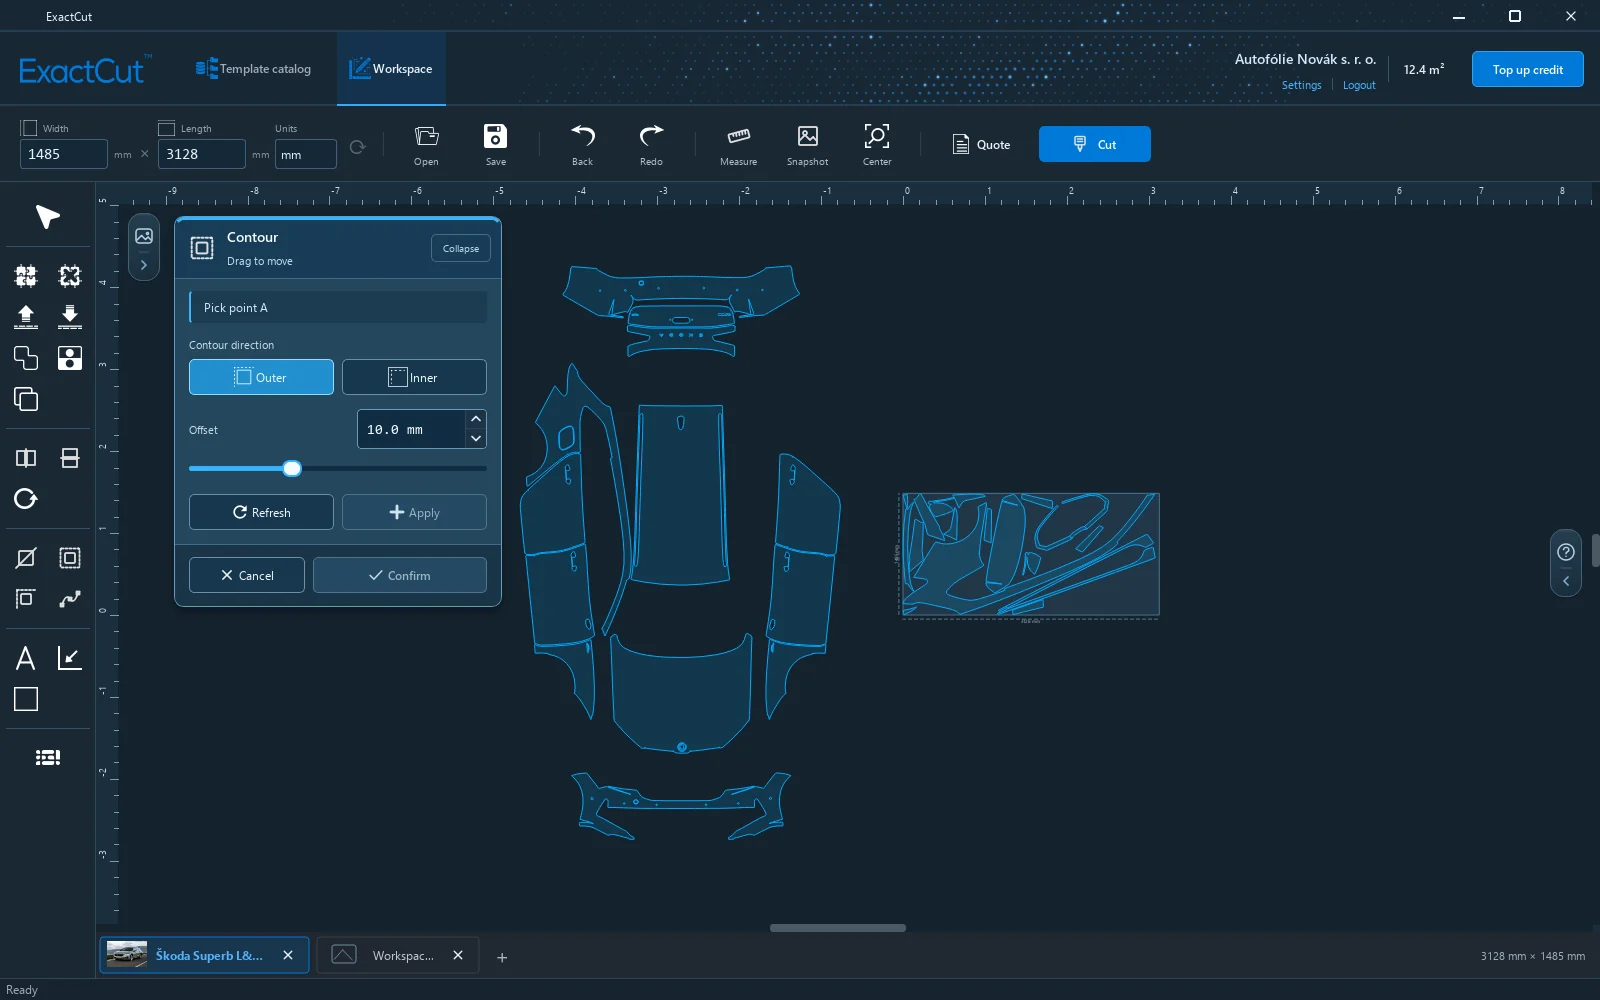
Partial contour does the same only on a chosen section of the outline. Once it is on, the outline under the cursor lights up purple (the outer edge as well as a hole). Click where the offset should start (point A) and where it should end (point B). Point B snaps only to the outline of point A. After that only the section between A and B stays lit; point at the one of the two sections that should get the offset and click it. Useful when the offset should go only on an edge that wraps around the panel, or only on part of a hole's edge.
Edit nodes
Edit nodes (E) opens the curve point editor of the selected part. The palette has these modes:
| Mode | What it does |
|---|---|
| Select | Grab and move individual points. |
| Add | A click on the curve adds a point. |
| Remove | A click on a point deletes it. |
| Smooth | Smooths the curve: Tolerance sets how many points are removed (more = smoother, less precise curve). |
| Round | Rounds the corner at the click with the Radius. |
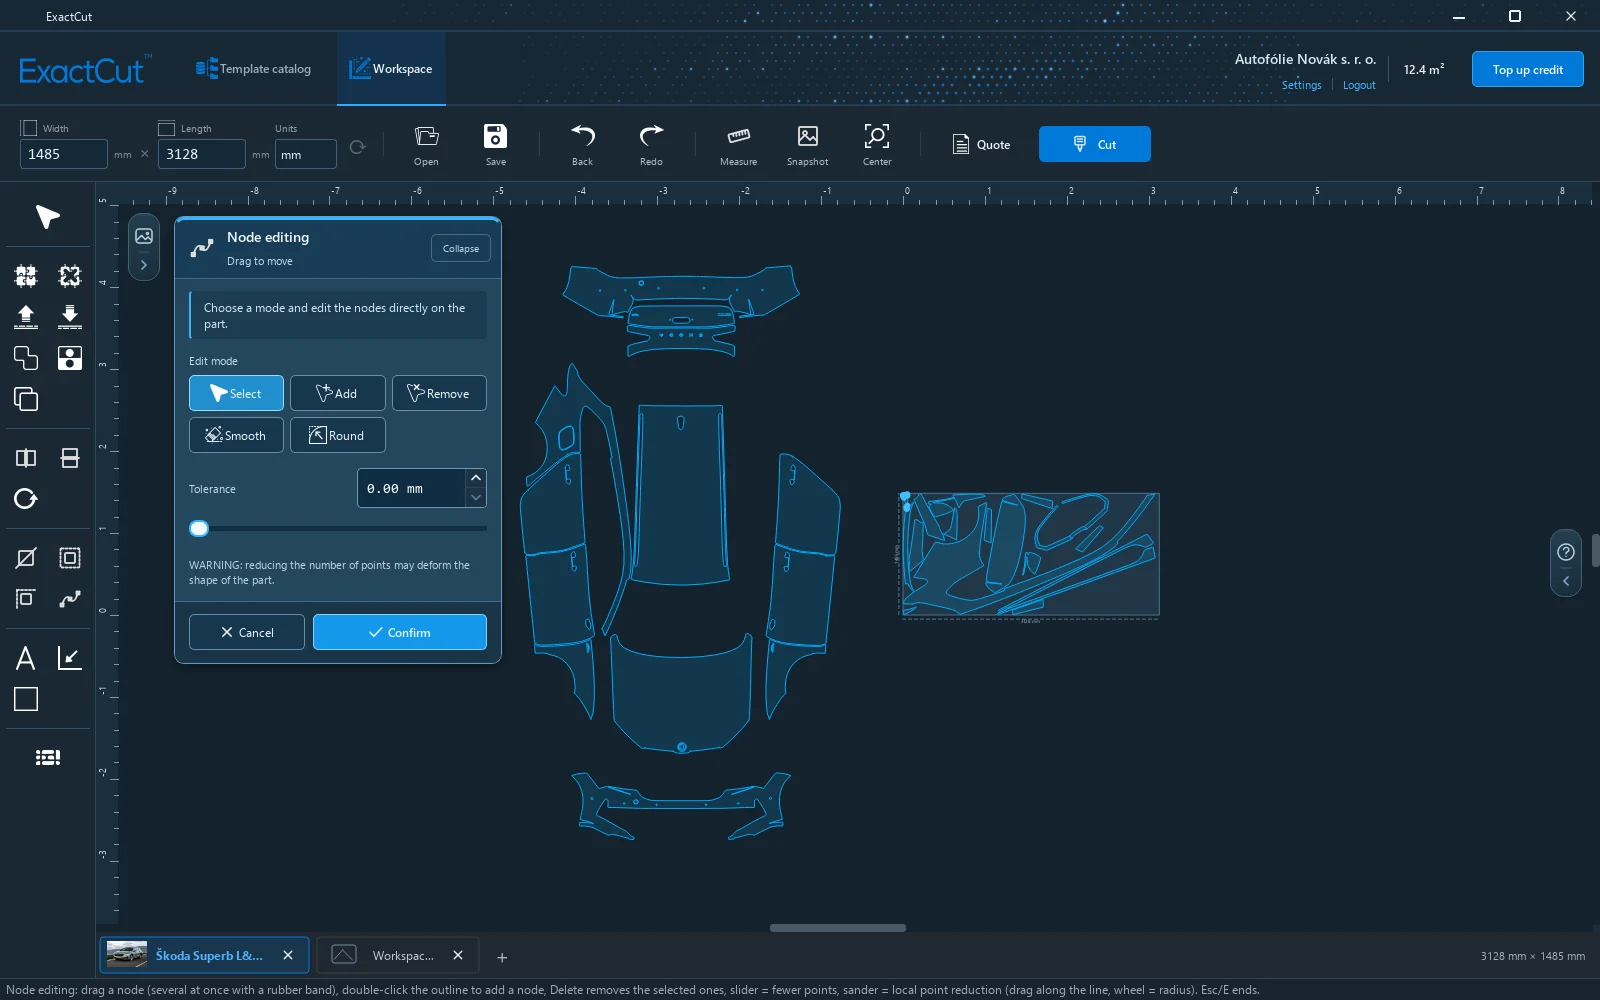
Changes show immediately; Confirm writes them into the part, Cancel restores the original shape. Templates store arcs precisely, so smoothing is usually needed only on parts edited by hand.
Text and shapes
Text places a label on the workspace (vehicle name, customer, note). Text is not cut and never goes to the plotter; it is only for orientation and is visible on the workspace snapshot. The palette sets the Text height.
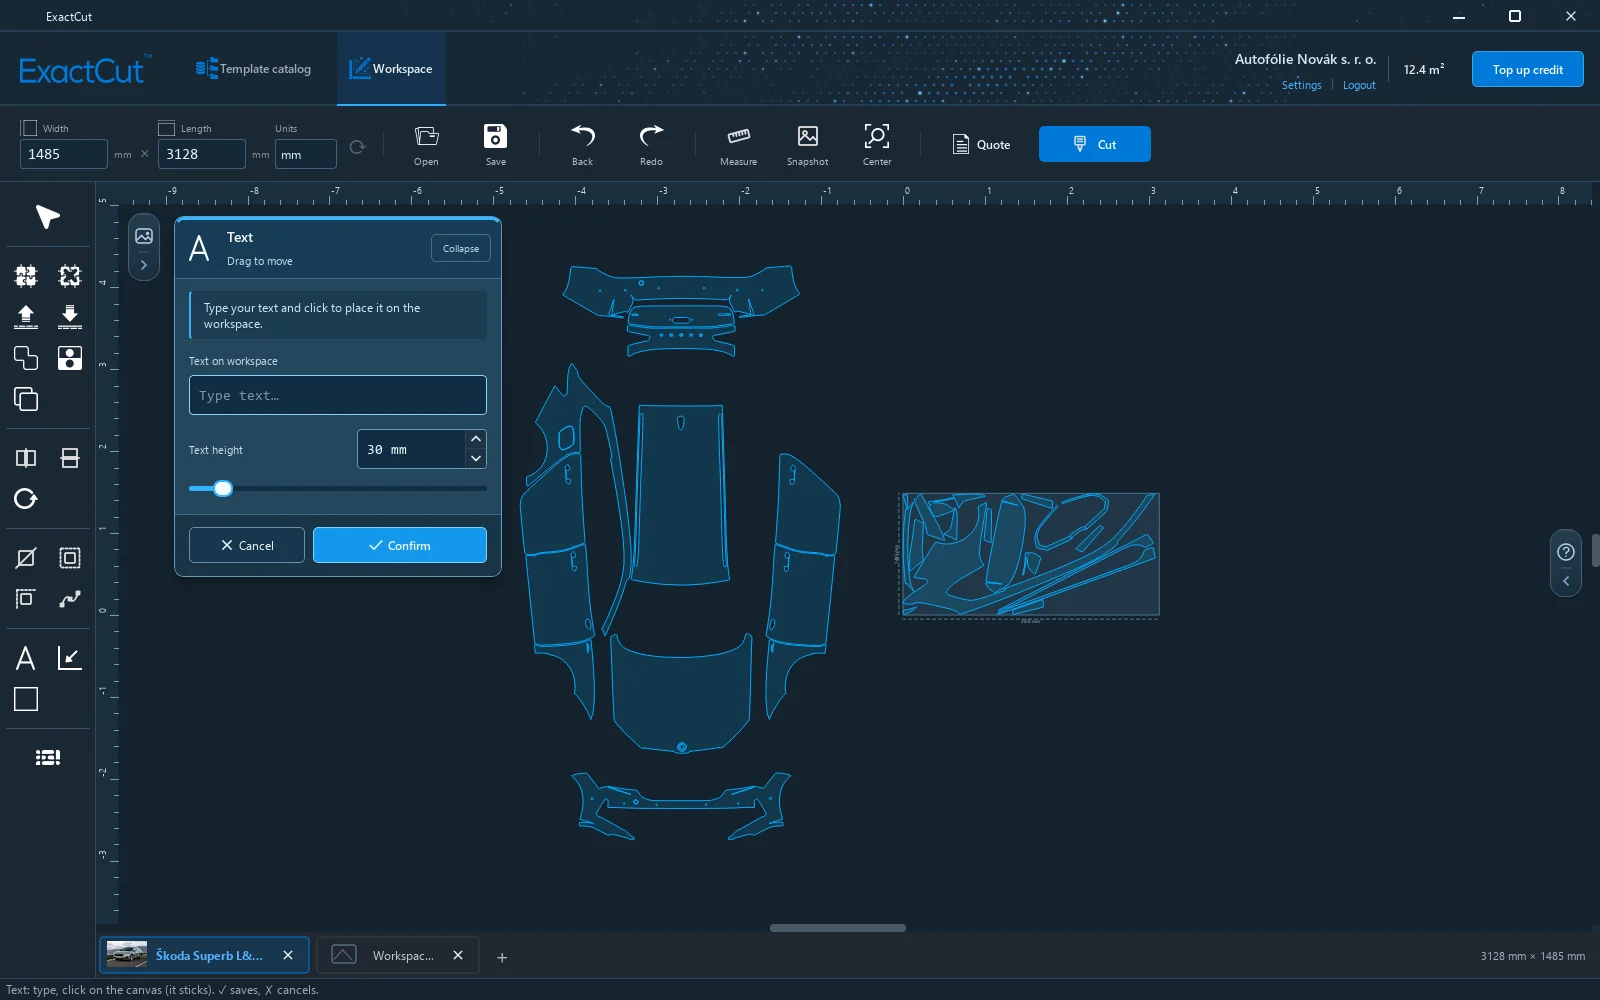
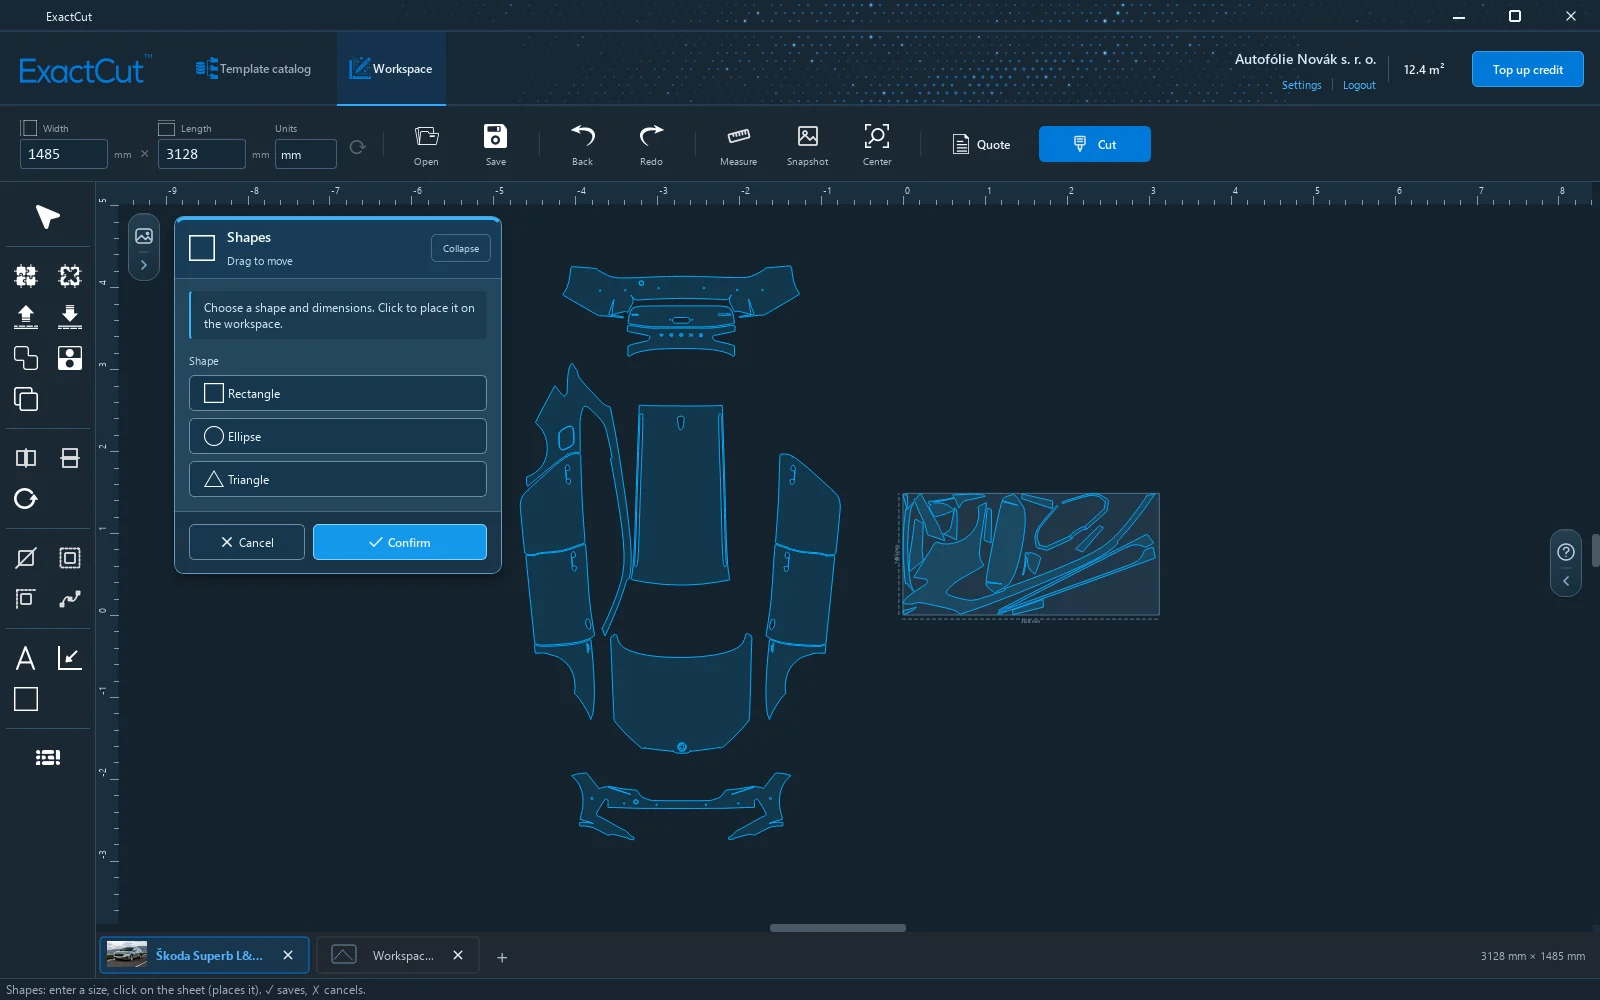
Shapes add a rectangle, ellipse or triangle with the given Width and Height in mm. A shape is an ordinary part: it is cut and can be edited like the others. Use it for a test cut, pads or simple pieces of film.
Remove cut-outs
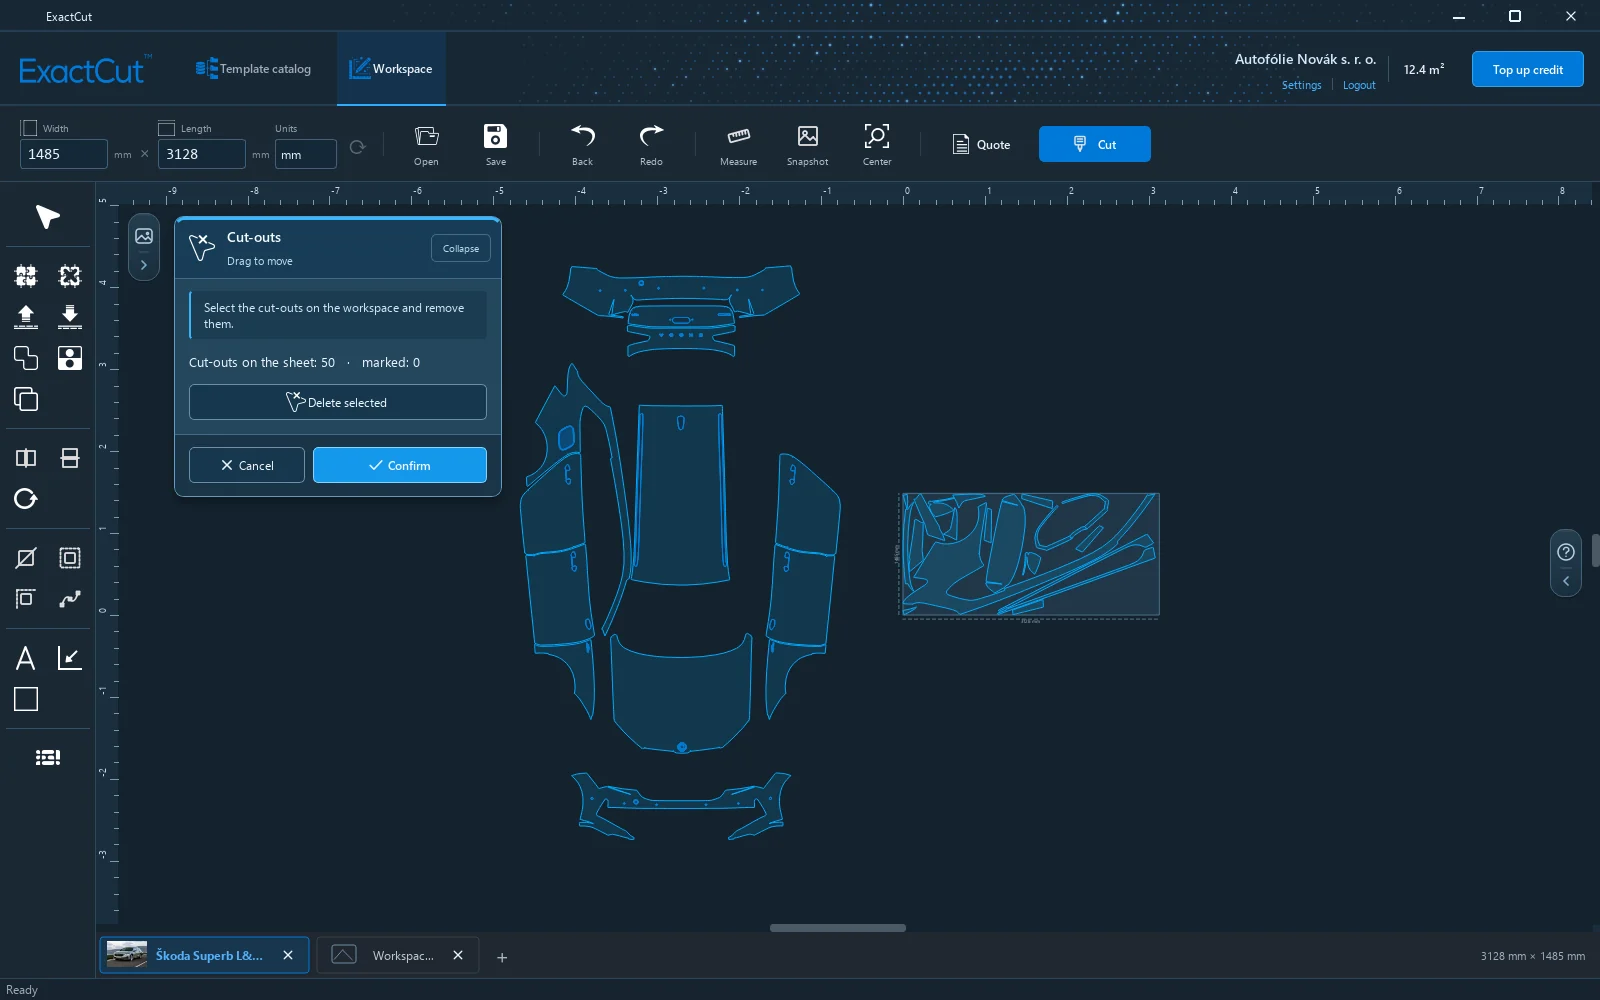
Parts have inner cut-outs (sensor, handle, washer-nozzle opening). Remove cut-outs deletes them, so only the outer outline is cut. After switching it on, the palette shows how many cut-outs are on the workspace; clicking on the workspace marks them, Delete selected removes them and Confirm writes the change. Useful when the customer does not want the opening or it is cut at installation.
Center, measure, snapshot
- Center selection (P) places the selected parts in the middle of the film vertically and at its start, 10 mm from zero. The fastest way to get parts from a template onto the film before laying them out by hand.
- Measure on the bar: click two points and the program shows the distance in the current units. Esc ends measuring.
- Snapshot saves a picture of the workspace on a white background as PNG; handy for approving the layout with the customer.
6 Auto-nesting
Auto-nesting lays the selected parts out on the film so that they take as little material as possible. The parts rotate freely and keep the given spacing. With a template of dozens of parts, nesting saves a noticeable share of film compared with a manual layout, and with it credit, because cutting is charged by area.
Starting
- Select the parts you want to lay out (Ctrl+A selects all). A single part is enough; with nothing selected the program warns Select at least one part to arrange.
- Click Auto-nesting in the left panel (the last button).
- Set the parameters and press Start (or Enter).
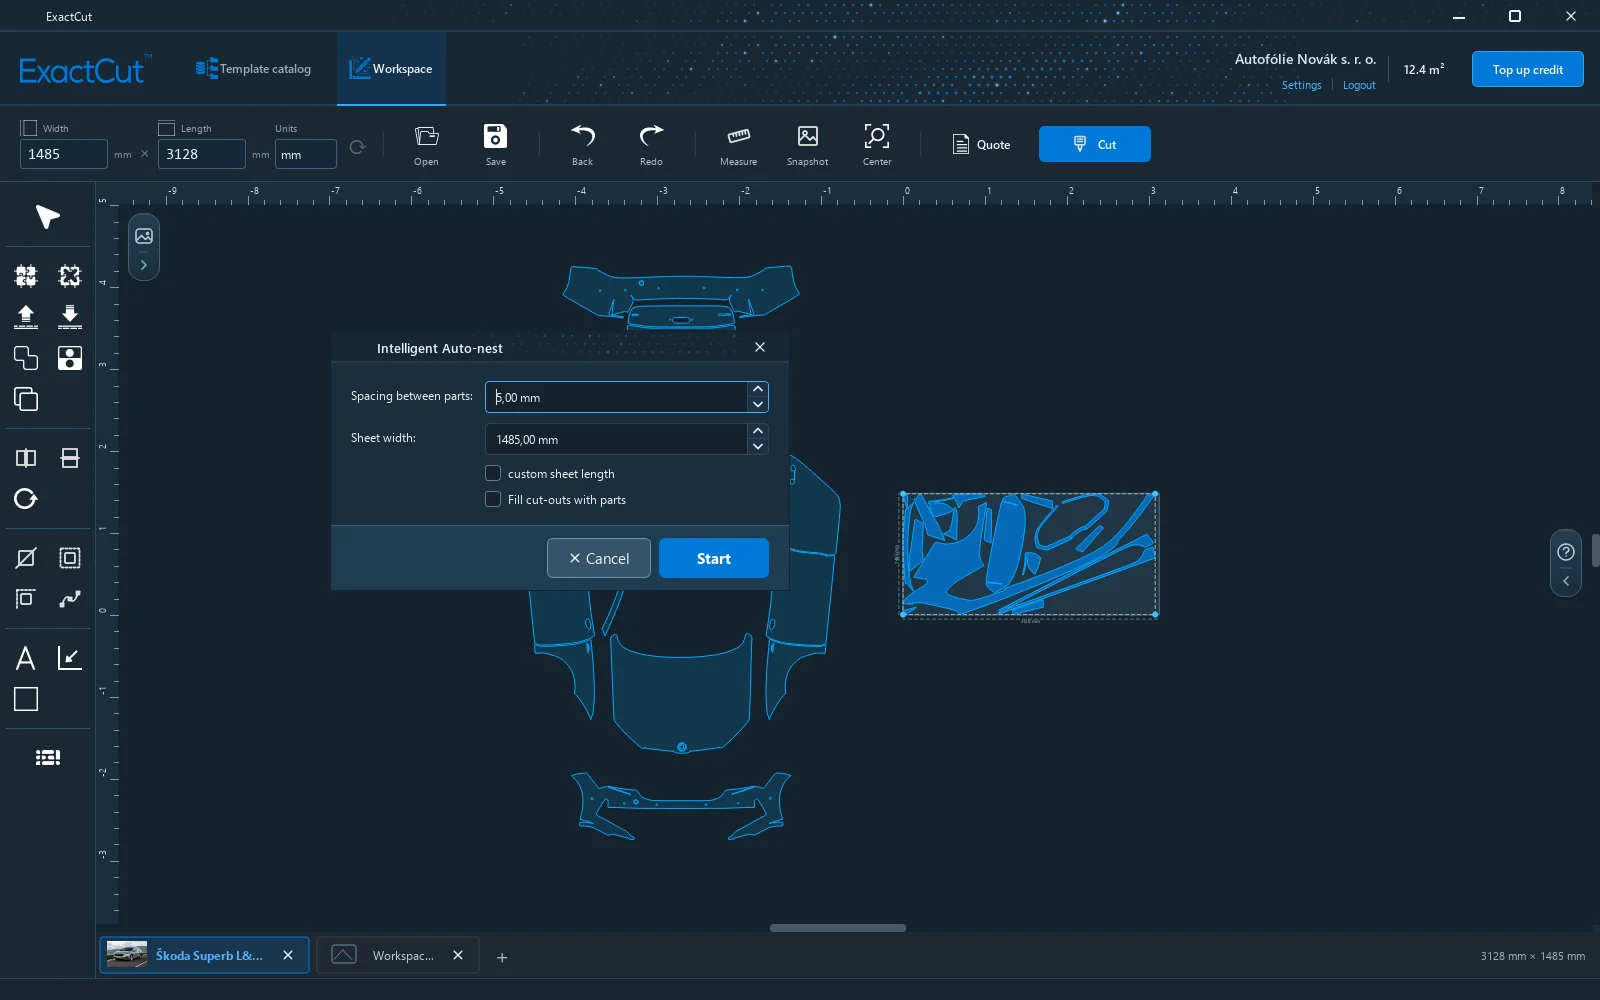
| Setting | Meaning |
|---|---|
| Spacing between parts | Distance between parts in mm, 5 mm by default (0 to 100). Smaller spacing saves film, larger makes weeding easier. |
| Sheet width | Taken from the film width on the bar. |
| custom sheet length | Layout on sheets of a given length (below). |
| Fill cut-outs with parts | Small parts may be placed inside larger openings of other parts. |
Text and labels are not included in the layout; they stay where they were.
Custom sheet length
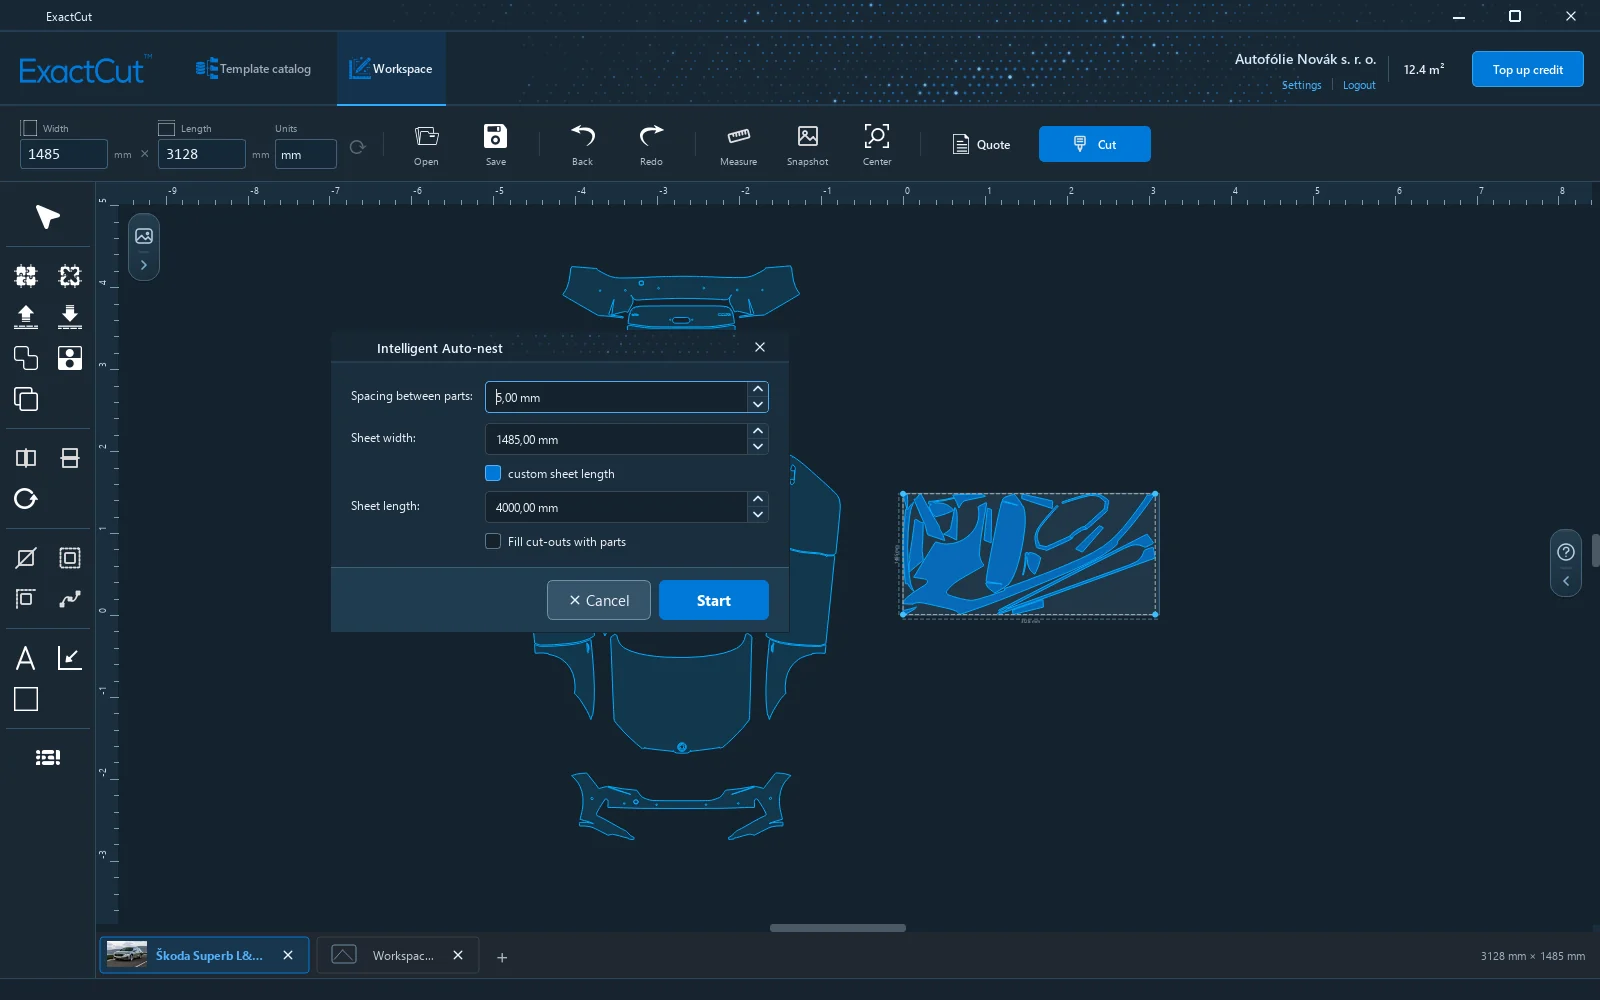
Ticking custom sheet length lets you enter the Sheet length (4000 mm by default). Parts that do not fit on the first sheet go on the next sheet of the same length. The sheets stay in the same workspace: the first in the cutting area, each next one 200 mm below the previous, so after cutting the first sheet you just move the next one onto the film.
Progress and result
The layout runs in the background; the progress window can be cancelled at any time. It takes from a few seconds with a handful of parts to about a minute with a whole template of dozens of parts. The program uses all processor cores; the longer it computes, the tighter the layout it finds.
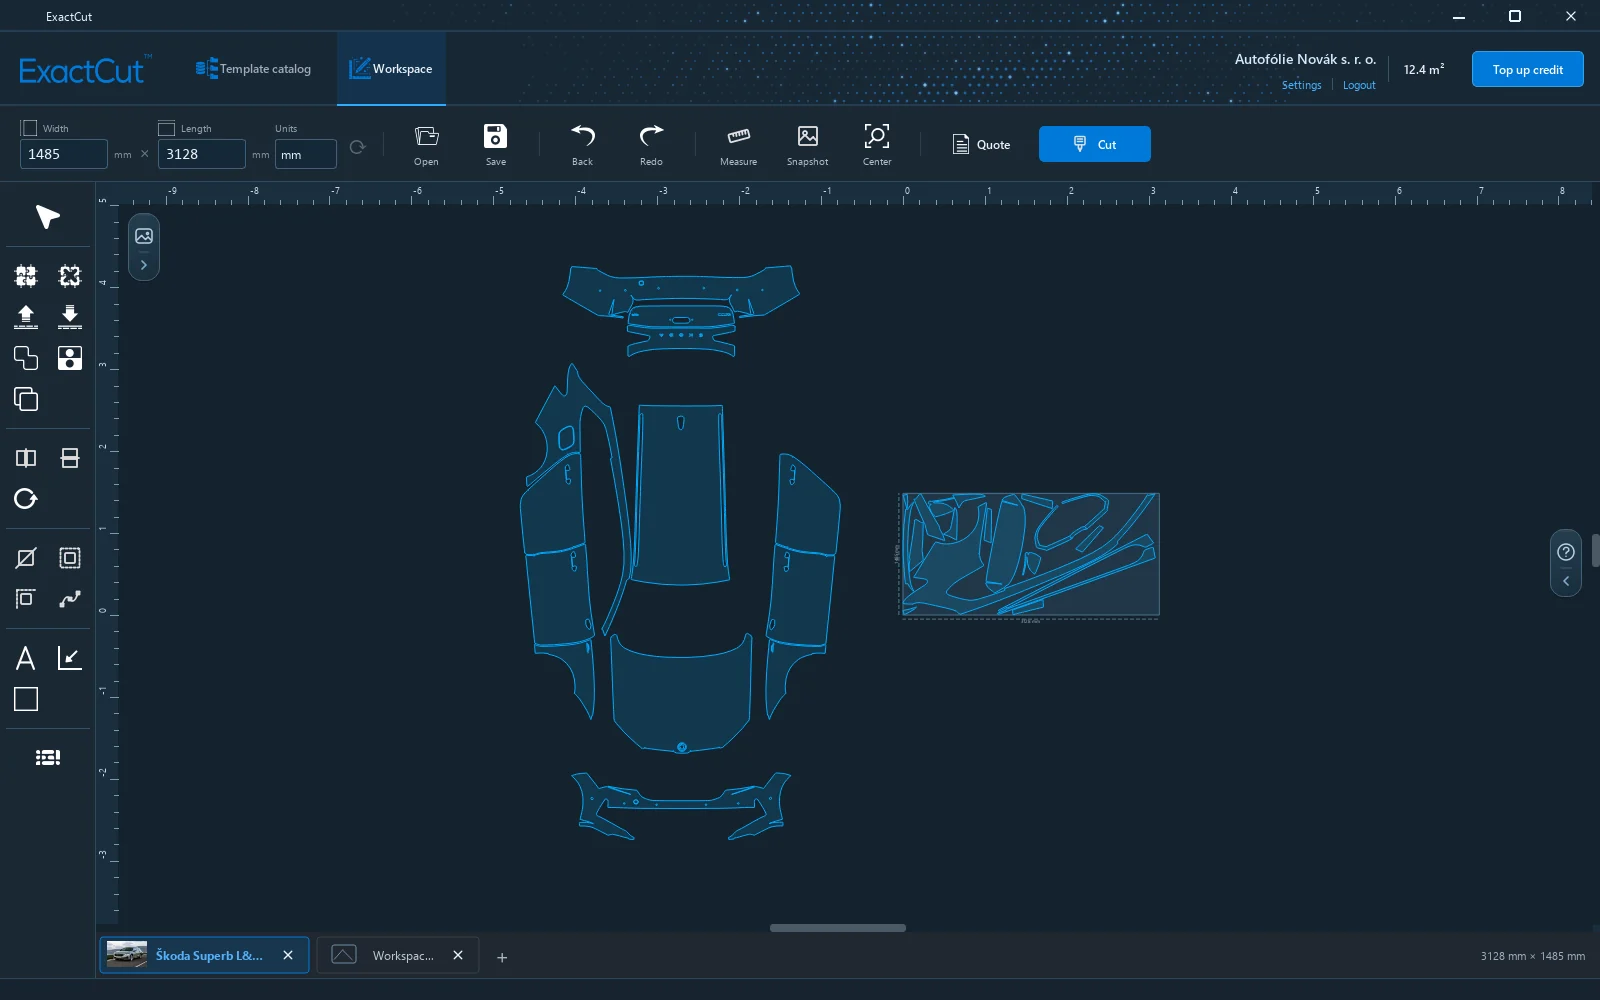
When it finishes, the parts are laid out on the film from its start. The result is one step: Undo (Ctrl+Z) returns all parts to where they were.
Tip: Edit the parts before nesting (offset, splitting, mirroring the other side). Nesting works with the finished outlines; a later change of a part does not break the layout, but the spacing may no longer fit.
Note: Group parts that should stay together before nesting; a group is laid out as one piece.
7 Cutting devices
ExactCut sends the cut straight to the plotter, without a detour through another program. The plotter is set up once; afterwards you only open the Cutting window.
The program talks HPGL, the language used by Roland, Graphtec, Summa, Mimaki, GCC and most generic cutting plotters. Blade speed and pressure are set directly on the machine; the program does not send them.
Device list
Settings → Devices shows your plotters. A star marks the default device, the one offered when cutting. Each entry shows the brand, width and connection.
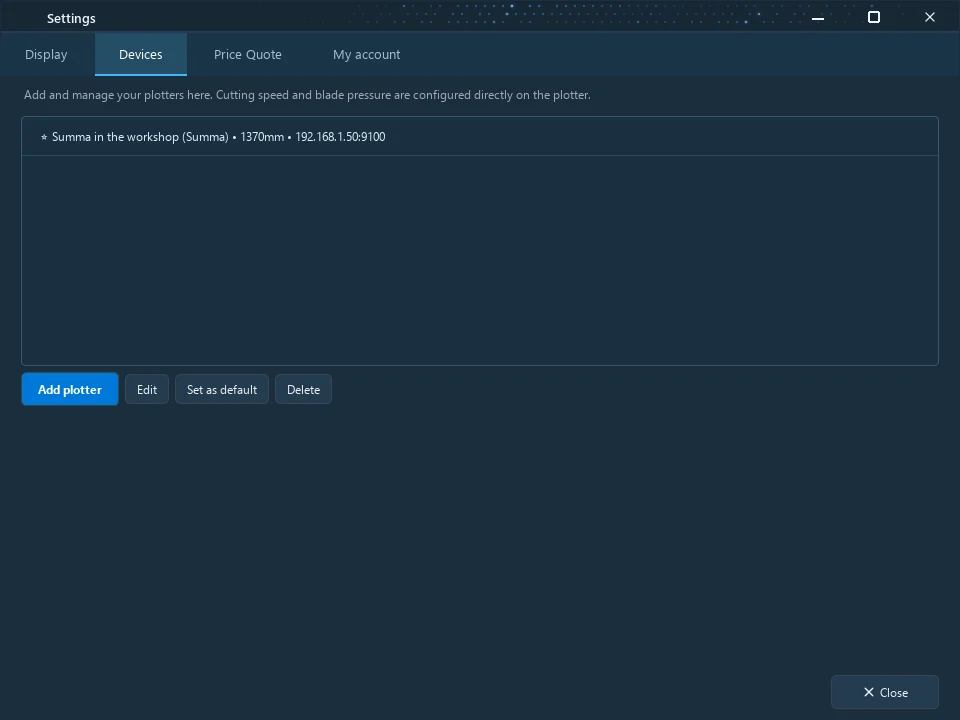
- Add plotter opens the form below.
- Edit opens the form for the selected device (a double-click does the same).
- Set as default makes the selected device the default.
- Delete removes the device after confirmation.
Adding a plotter
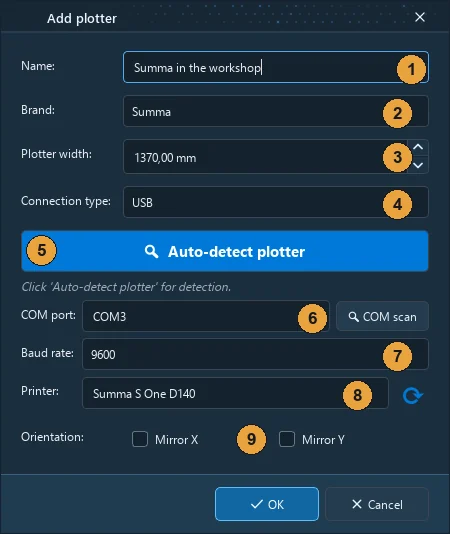
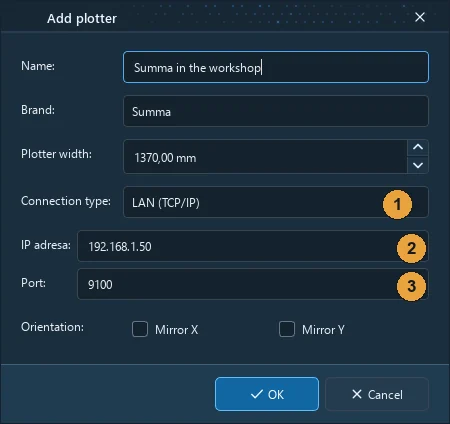
- Name, for example Summa in the workshop. The plotter is offered under it when cutting.
- Brand: Generic HPGL, Roland, Graphtec, Summa, Mimaki, GCC or Chinese generic. It determines the dialect of commands sent to the plotter.
- Plotter width: usable cutting width in mm (1490 by default). The film on the workspace must not be wider.
- Connection type: USB or LAN (TCP/IP).
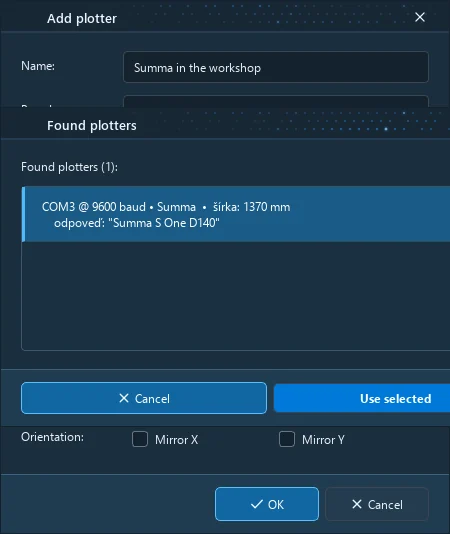
- Auto-detect plotter scans Windows printers and serial ports and fills in the device it finds. The fastest route; when it finds nothing, enter the port by hand.
- COM port for a serial connection (for example COM3); COM scan scans only serial ports.
- Baud rate of the serial port (9600 to 115200, typically 9600; it must match the plotter setting).
- Printer: connection through the Windows driver; choose the plotter from the list of installed printers, the arrow refreshes the list.
- Orientation: Mirror X and Mirror Y flip the data when the plotter cuts in the opposite direction from what the program expects.
For a network plotter choose LAN (TCP/IP) and enter the plotter's IP address and Port (9100 by default).
Auto-detect plotter shows the devices found with their port, speed and width; selecting one fills in the form.
The OK button saves the device. The program checks the name, width and connection and reports anything missing. The first device added becomes the default.
Communication test
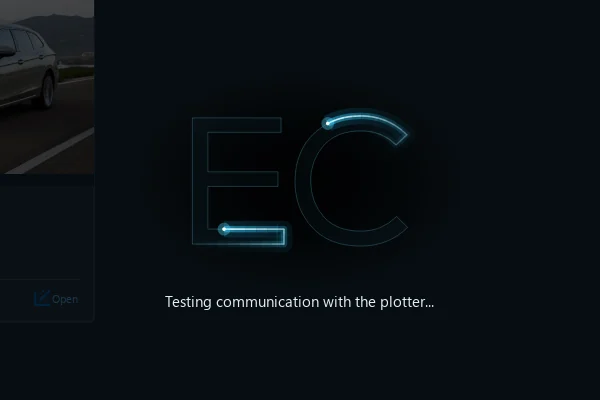
After saving, the program quietly tries two-way communication with the plotter (a short window Testing communication with the plotter…). The result only decides whether the button for reading the media width from the plotter is active on the workspace bar. Cutting works even without two-way communication.
Tip: Make the first cut with a new device on an offcut of film with a simple shape (the Shapes tool). You check the blade pressure, the cutting direction and whether the device needs mirroring. The preview in the Cutting window shows the shape, but not the pressure.
Warning: Mirroring in the device concerns only the direction of the cut on the machine. A part for the other side of the vehicle is mirrored with the Mirror tool on the workspace.
8 Cutting
Cutting sends the parts from the workspace to the plotter. Only parts lying entirely on the film are cut; text and labels are not. Cutting is charged from credit by the area of the parts, or it is included in an active plan (chapter Account, credit and quotation).
Cutting window
On the workspace press Cut.
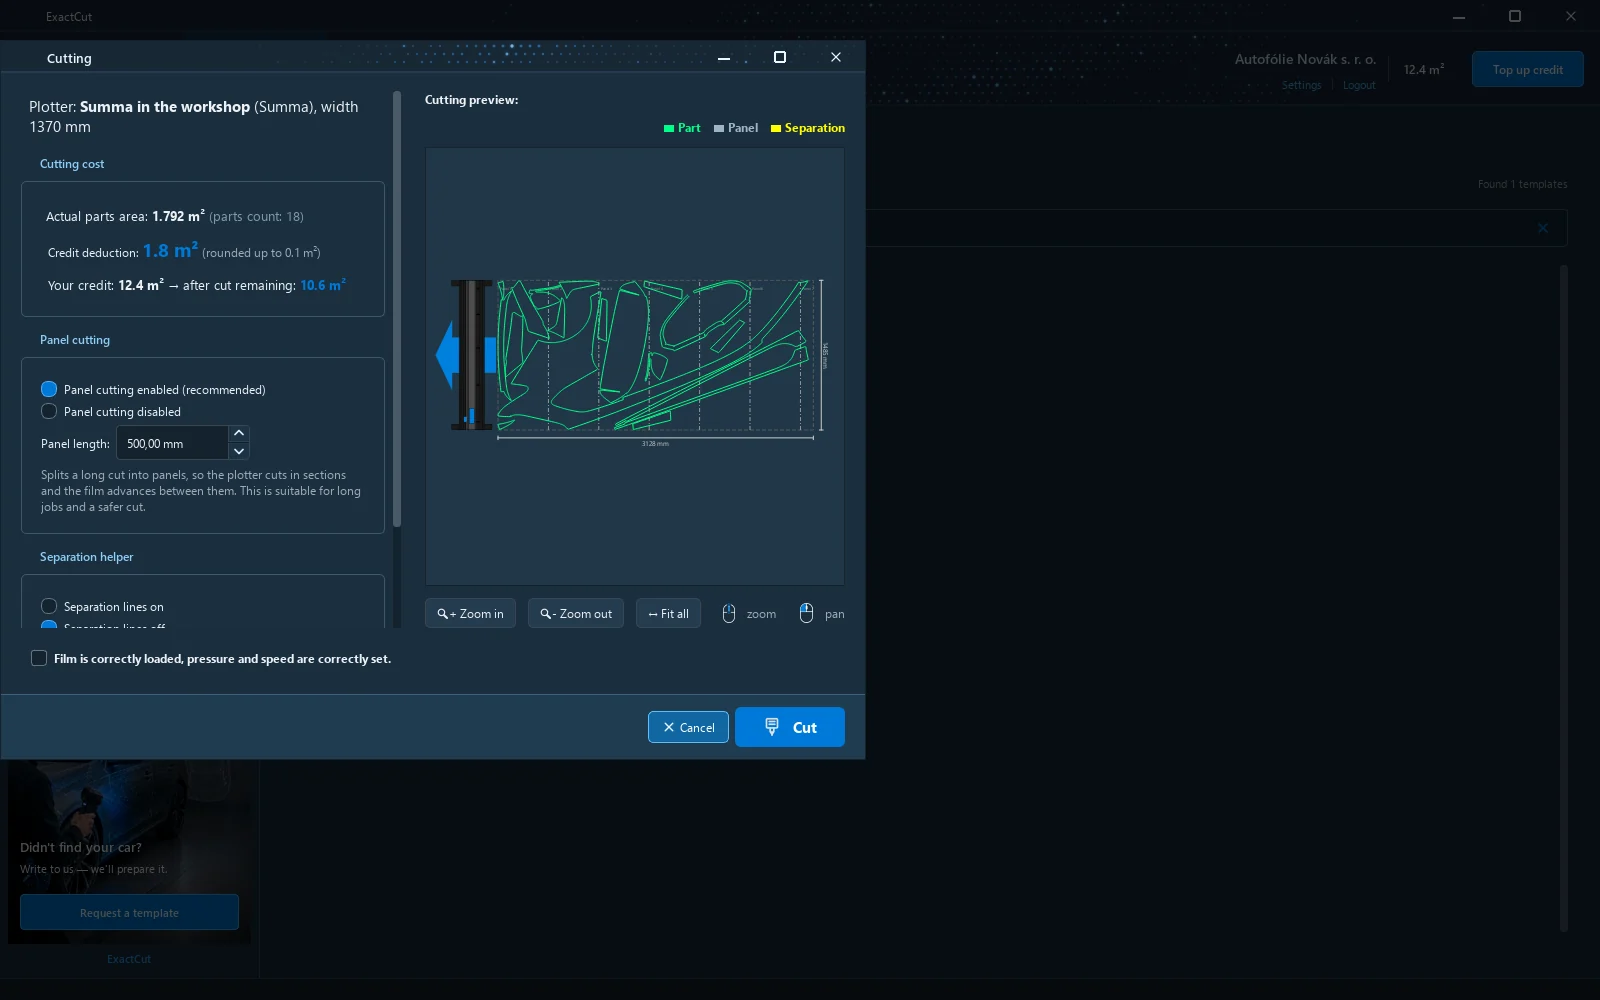
- Plotter that cuts (the default device), its brand and width. Without a plotter the window warns that no plotter has been added.
- Cutting cost: actual area of the parts and their number, Credit deduction (area rounded up to 0.1 m²), your credit and what remains after cutting.
- Cutting preview: exactly what goes to the machine. Legend: Part (outlines), Panel (panel boundaries), Separation (helper cuts). Buttons Zoom in, Zoom out, Whole area; the wheel zooms, the middle button pans.
- Panel cutting and Separation helper (below).
- Confirmation Film is correctly loaded, pressure and speed are correctly set. Without it the cut does not start; the box shakes and highlights.
- Cut sends the job, Cancel closes the window.
Panel cutting
A long cut is divided into panels and the plotter cuts them one after another in the direction of the film feed. It prevents the material from drifting on long jobs, so it is on by default. Panel length is 500 mm by default (at least 100 mm). With panelling off, the whole area is cut at once.
Separation helper
Separation lines add cuts around the parts and divide the waste into smaller pieces that weed more easily. They keep a 1 mm distance from the parts. Separation spacing is 200 mm by default (at least 50 mm). If a part lies too close to the film edge, the program says that separation needs at least 1 mm around the parts; move the parts away from the edge or switch separation off.
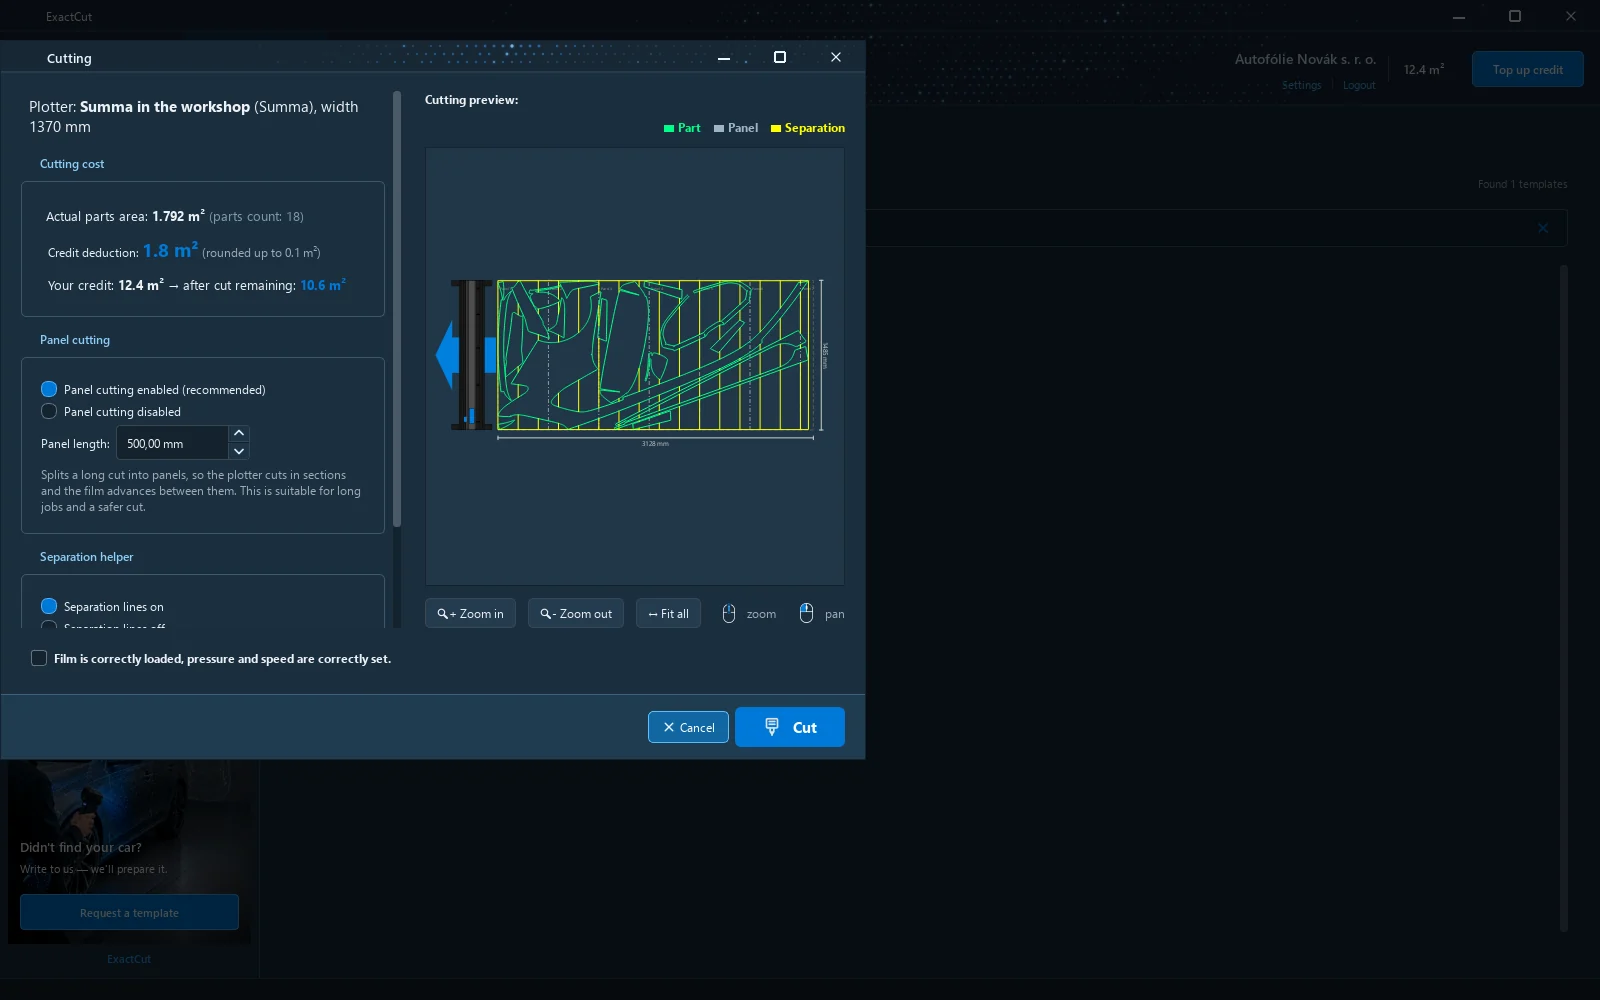
The program remembers the panel and separation settings for the next cut.
Credit and plan
When the credit is not enough for the job, the window shows a red Insufficient credit with the required and available area and the Cut button is disabled. Top up with Top up credit in the header; after topping up, the values in the Cutting window refresh.
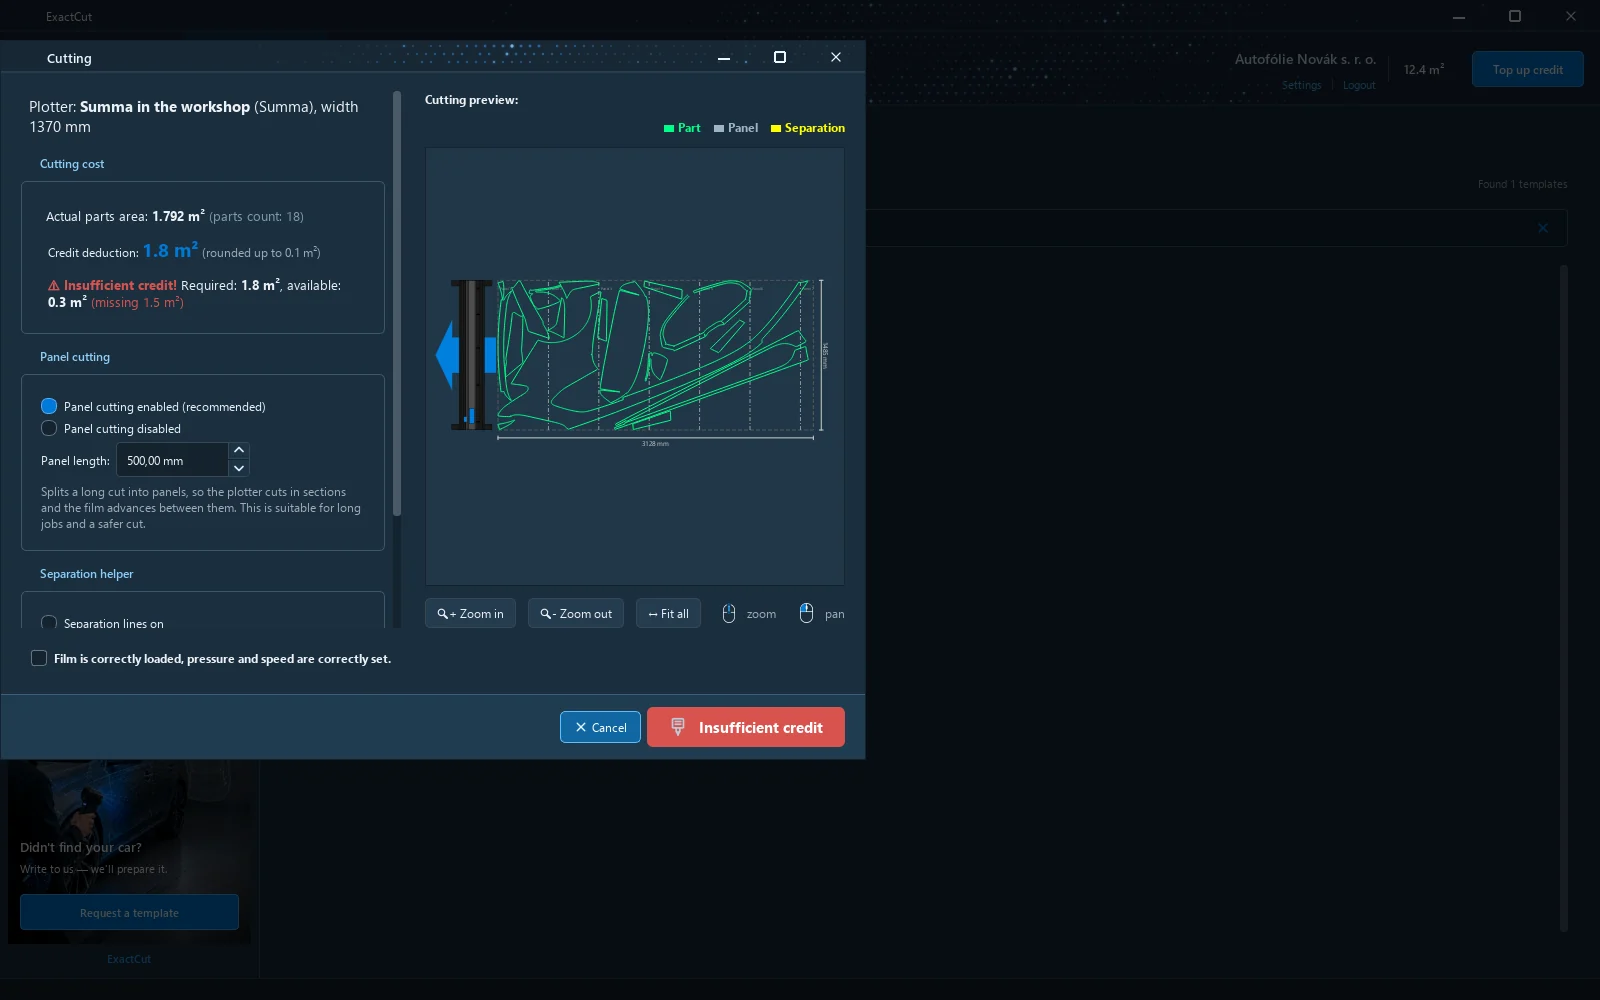
During an active cutting plan the cut is included: the window shows Cutting is included in your active plan and the credit in m² stays untouched.

Sending the job
After you press Cut, the program:
- reserves credit for the job on the server;
- generates the plotter commands and sends them (through a Windows printer, a serial port or the network);
- on success shows The data has been sent to plotter with the deducted area and the remaining credit;
- stores a record in the Cutting history.
With a serial or network plotter the program sends data as fast as the machine accepts it, often during the whole cut. Then the window Sending to plotter appears with progress and a STOP button.
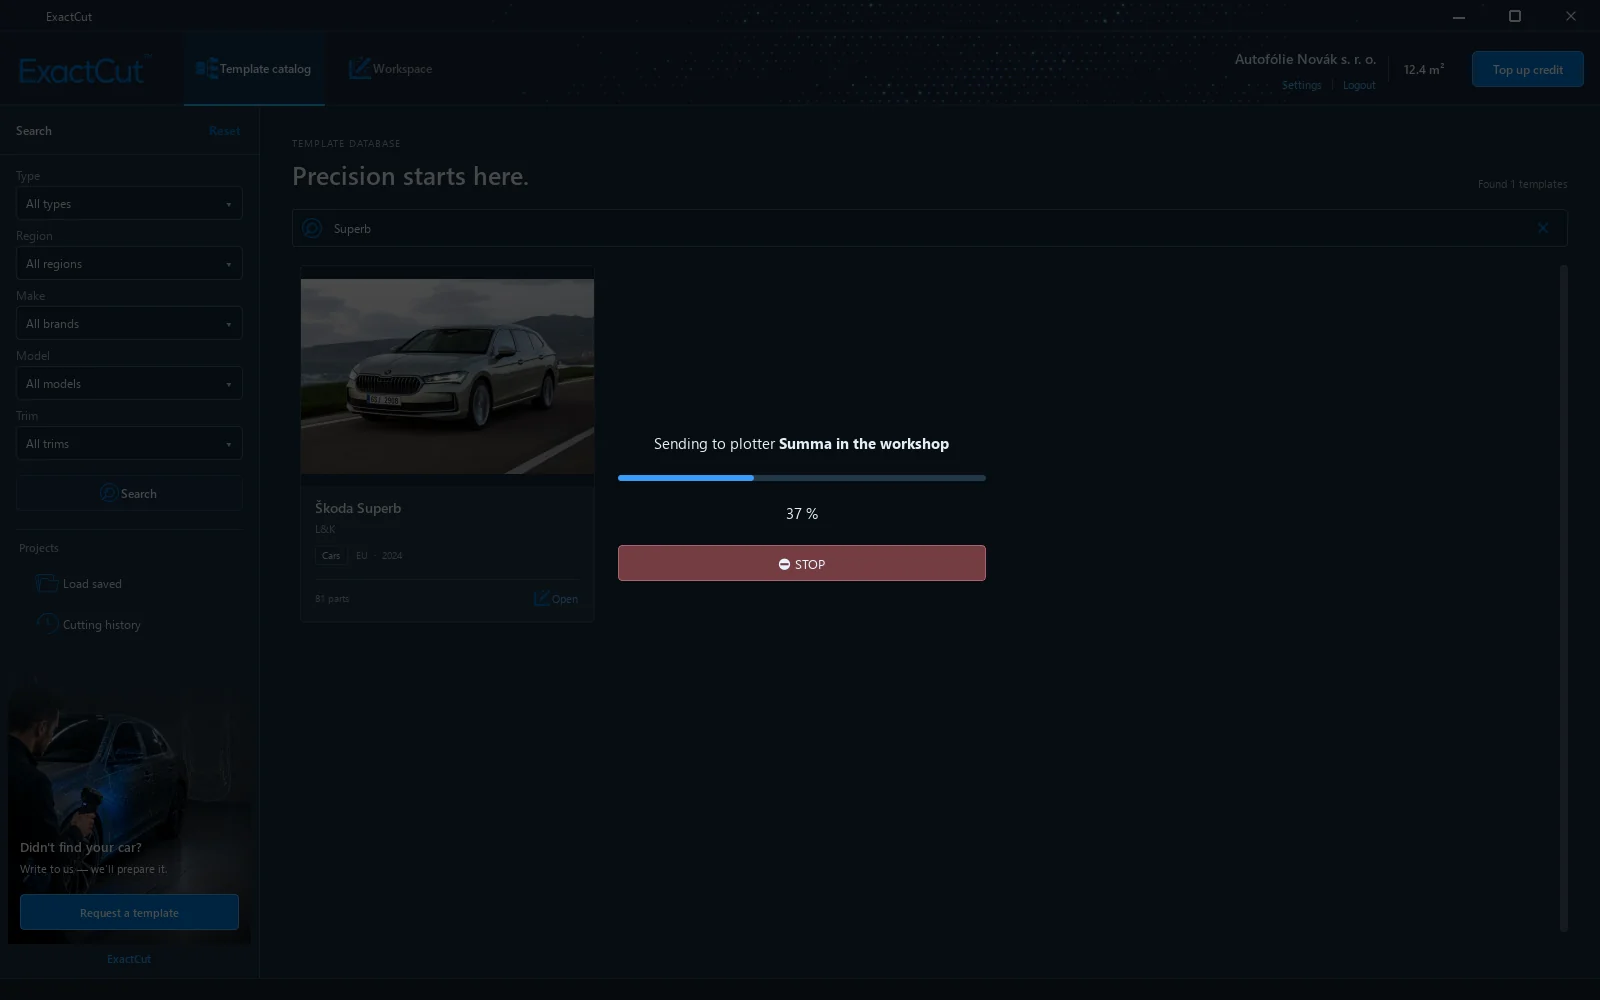
- STOP interrupts the transfer and cancels the job in the Windows print queue too. The plotter finishes only what it already has in memory; stop it on the machine as well.
- If sending fails (Sending failed), the program prints the reason and returns the reserved credit. Check the cable, that the machine is on and the settings in Devices.
Outlines are cut in nearest-neighbour order; inner cut-outs before the outer outline of a part. The cut origin is set on the plotter; the program cuts from it.
What to prepare before cutting
- The film width on the bar matches the loaded material and is not larger than the plotter width.
- The parts lie entirely on the film and are not red (chapter Workspace and controls). A red or protruding part stops the cut.
- Offsets, splits and mirrored parts are done; the plotter cuts the curve exactly as it is on the workspace.
- The film is loaded on the plotter and the origin, pressure and speed are set.
Tip: The layout of a successful cut is in the Cutting history and can be cut again from there, for example after a damaged part.
When cutting does not work
| Message | What to do |
|---|---|
| No plotter has been added. | Add a plotter in Settings → Devices. |
| There are no parts on the plotter workspace. | No part lies entirely on the film. Move the parts inside or use Center or Auto-nesting. |
| Insufficient credit | Top up credit or buy a cutting plan. |
| Failed to reserve credit. | Connection to the server dropped. Check the internet and try again. |
| Sending failed | The plotter does not respond: cable, power, the right port or IP address in Devices. The credit was returned. |
| The plotter cuts mirrored or outside the film | Switch Mirror X / Y in the plotter settings on or off; check the origin on the machine. |
| Parts come out shifted on a long cut | Leave panel cutting on, or shorten the panel length. |
9 Account, credit and quotation
The catalogue, editing and nesting are free; only cutting is paid. Either with credit in m² by consumption, or with a time plan with unlimited cutting.
Credit and plans
| Product | Price excl. VAT | What it includes |
|---|---|---|
| Per m² | 6 € per m² | Credit without expiry, cutting by consumption. The area of the parts rounded up to 0.1 m² is deducted. |
| Monthly plan | 150 € | Unlimited cutting for 1 month, mobile app included. |
| 3-month plan | 400 € | Unlimited cutting for 3 months. |
| 6-month plan | 700 € | Unlimited cutting for 6 months. |
| Annual plan | 1 300 € | Unlimited cutting for 12 months. |
VAT according to the country in the billing details is added to the prices (23 % in Slovakia). A plan starts after payment; a further purchase extends the current validity. During a plan the credit in m² is not deducted and stays available after the plan ends. No automatic payments are made; renewal is always a manual purchase.
Topping up credit
Click Top up credit in the window header.
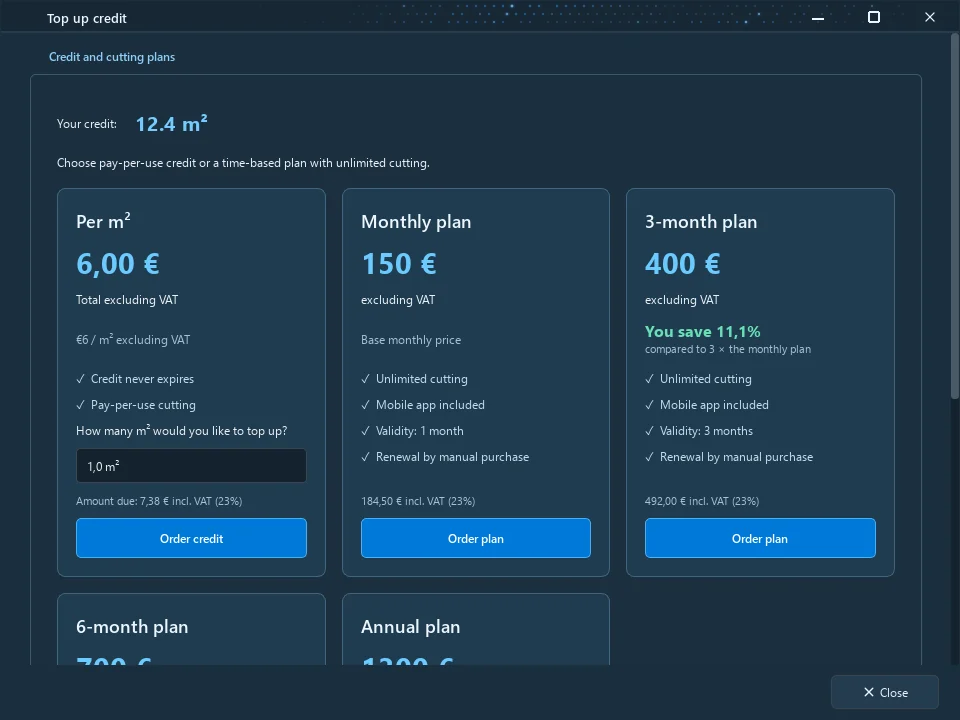
- For Per m² enter how many m² you want to top up; the price with VAT recalculates at once. Press Order credit.
- For a plan press Order plan on its card.
- The payment gateway opens directly in the program: card, Apple Pay, Google Pay or bank transfer, as the gateway offers.
After payment the window closes by itself and the program credits the amount or plan within a few seconds; the header shows the new state. If the payment is not confirmed immediately, the program waits a while and says so; the credit is added as soon as the bank confirms the payment. When the built-in window cannot open, the payment opens in the browser.
An invoice for every payment is created automatically and is in Settings → My account under Invoicing (below).
My account
Settings → My account.
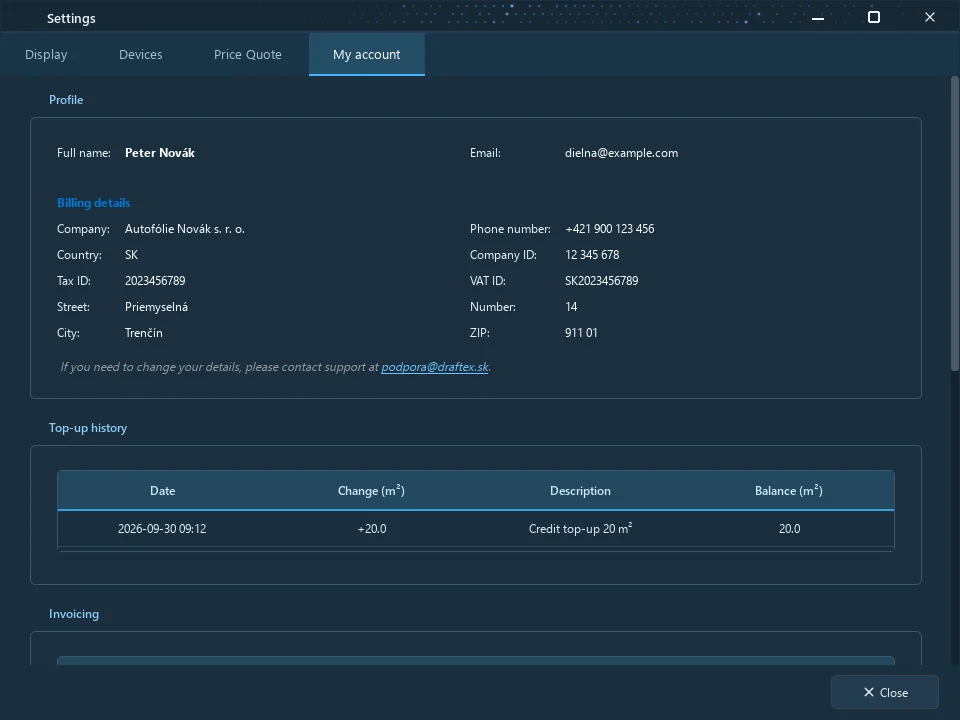
- Profile: name and e-mail of the account.
- Billing details: company, registration numbers, VAT number, address, phone. The country determines VAT. Changes are handled by support.
- Top-up history: date, credit change in m², description and balance after every transaction (top-ups and cut deductions).
- Invoicing: list of invoices; Open shows one, Save stores it as PDF.
- Cutting history: date, name, area, number of parts and state of every cut.
- Change password: current password, new password (at least 6 characters) and its confirmation.
Long lists show the first rows; the more button expands them.
Quotation for the customer
The Ponuka button on the workspace bar creates a PDF quotation from the parts on the workspace: a list of parts with their area, prices per m² from your price list, optional custom items (labour, material) and the total. The quotation can be saved as PDF or printed.
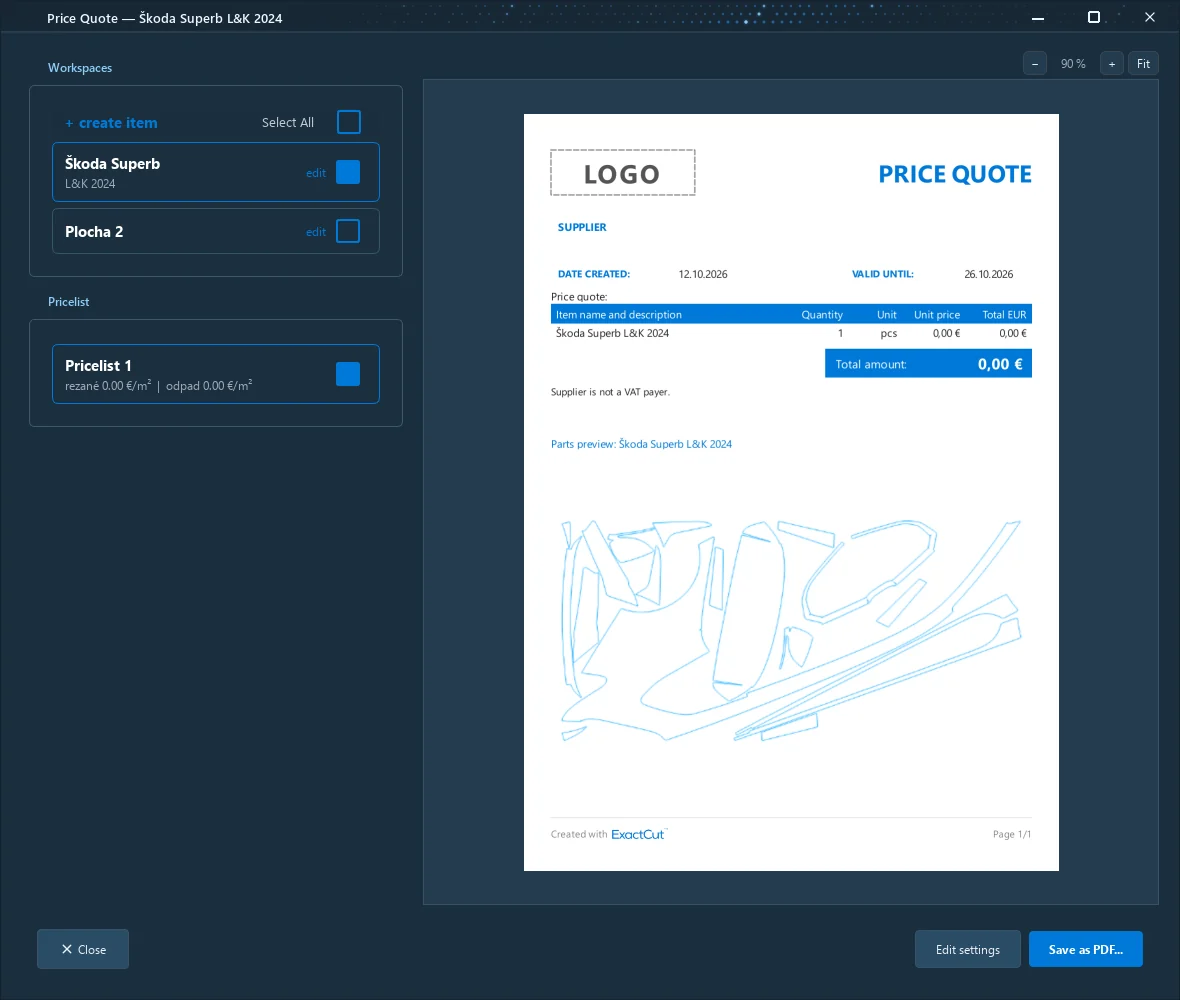
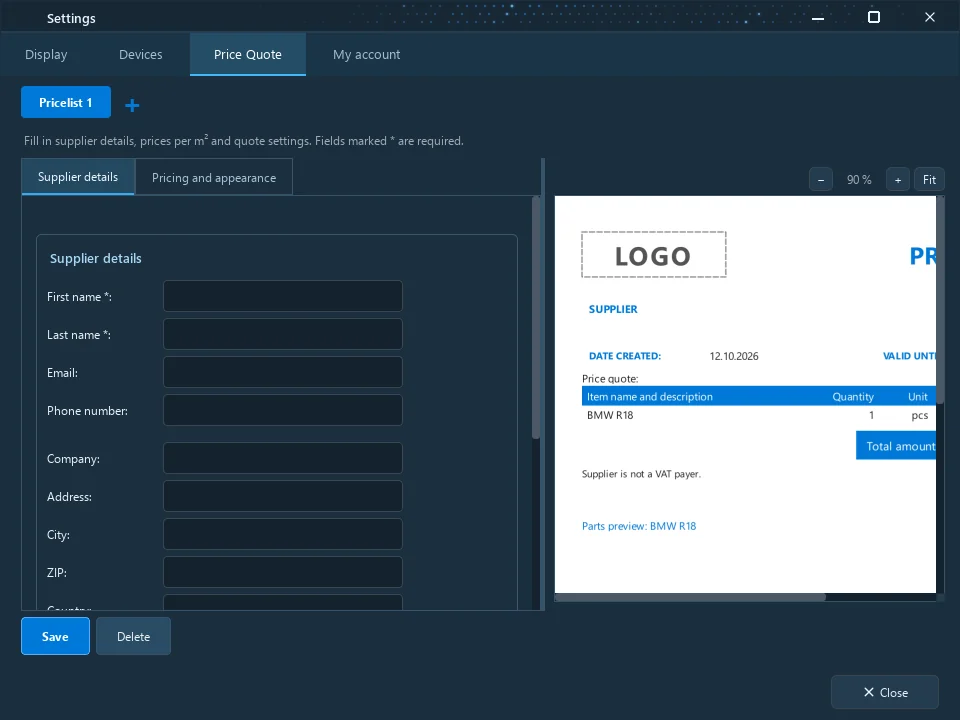
The data for the quotation is set in Settings → Price Quote: supplier (company, address, registration number, contact), logo, currency (43 currencies are offered), prices per m² and quotation texts. Fields marked with an asterisk are required. There can be up to five price lists, for example separate ones for PPF, car wrap and tint.
Note: The quotation is your document for the customer; it has nothing to do with the credit or the ExactCut prices.
10 Settings
Settings → Display holds the program options. Devices, the quotation and the account have their own chapters.
- Show warning when closing workspace and when closing last workspace: a question before closing a tab with parts. If you chose Don't show again at the question, you restore it here.
- Don't show help (only the side tab remains): the Help panel does not unfold by itself when a workspace opens.
- Show work areas at the bottom: workspace tabs below the canvas (default) or above it.
- Display size.
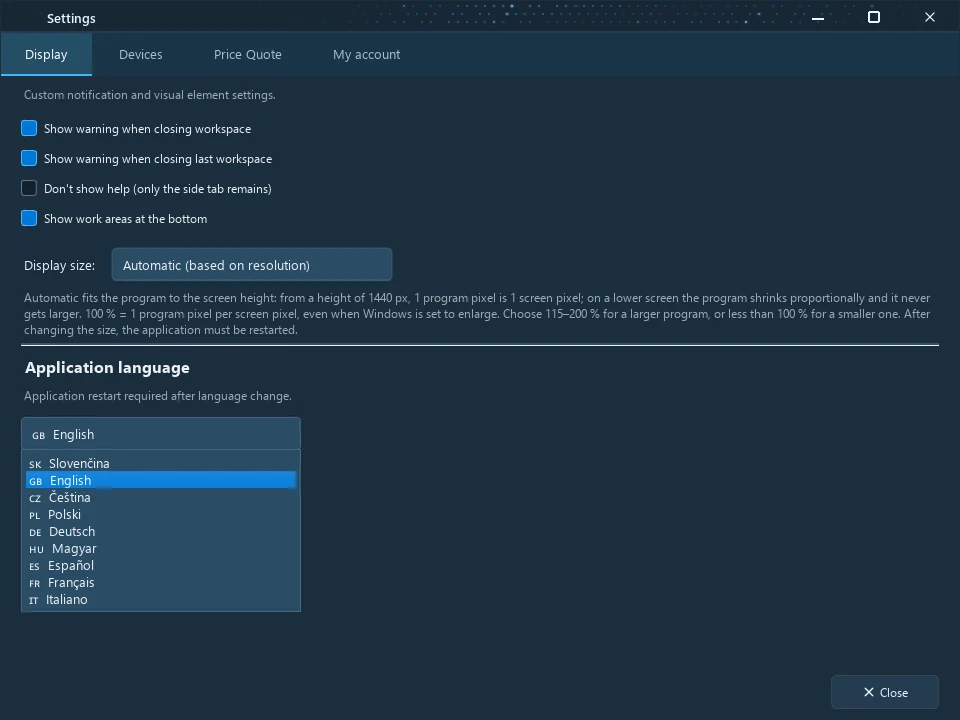
- Application language.
Display size
The program adapts to the screen height: Automatic means that from a height of 1440 px one program pixel is one screen pixel; on a lower screen the program shrinks proportionally, and automatic never makes it larger. On a common 1920 × 1080 monitor the program is therefore at 75 %.
Manual choices: 100 % = one program pixel per screen pixel, even if Windows has scaling set; 115 % to 200 % enlarge the program (useful on a high-resolution monitor or when working from a greater distance); choices below 100 % shrink it. After a change the program asks whether to restart; the change applies only after a restart.
Tip: The main window needs at least 1050 × 680 px. If it does not fit the screen with a manually enlarged display, return the choice to Automatic.
Application language
The program offers nine languages: Slovak, English, Czech, Polish, German, Hungarian, Spanish, French and Italian. At installation the language follows the wizard language; here you change it. The change applies after a restart, which the program offers at once.
Where the settings are stored
The program settings, the plotter list and the remembered sign-in are in the Windows user profile, not in the program folder; an update or a reinstall does not delete them. Projects, cutting history, credit and invoices are on the server and belong to the account, not to the computer.
11 Troubleshooting
Support: support@exactcut.sk, phone +421 952 732 850. Attach what happened, a screenshot and, if the program crashed, the log (below).
Installation and start
| Problem | Solution |
|---|---|
| Windows SmartScreen: Windows protected your PC | Click More info and Run anyway. The installer is signed by Draftex s. r. o. |
| The antivirus blocked or deleted the installer | A false alarm on a new, not yet widespread file. Add the installer to the exceptions or download it again from exactcut.sk; you can also check the file on virustotal.com. |
| ExactCut cannot start — the installation is damaged | Part of the program is missing (for example after an antivirus intervention). Reinstall from the installer; the settings stay. |
| ExactCut failed to start with the path to the log | Send the log to support. It is in %LOCALAPPDATA%\ExactCut\exactcut.log (type %LOCALAPPDATA%\ExactCut into the address bar of File Explorer). |
| The program is too large or too small on the screen | Settings → Display → Display size, return to Automatic or choose another percentage. |
Sign-in and account
| Problem | Solution |
|---|---|
| Invalid e-mail or password | Check for a typo and the keyboard language. Reset the password with Forgot password?. |
| The new password after a reset did not arrive | Look in the spam folder. After five requests in a row the account is blocked for a while; wait and try later, or write to support. |
| Signing in runs long and ends with a connection error | The program needs the internet (HTTPS, port 443). Check the connection and the firewall; on a company network ask the administrator to allow app.draftex.sk. |
| I want to change the billing details or the account e-mail | Write to support; in the program only the password and the settings can be changed. |
Update
| Problem | Solution |
|---|---|
| The update cannot be completed | Free up disk space, temporarily switch off the antivirus or allow the program in the firewall, and press Try again. The program keeps running in the old version meanwhile. |
| Windows asks for administrator consent during the update | That is expected: the new version is written to the Program Files folder. Confirm. |
| The program does not start after the update | Run the installer from exactcut.sk; reinstalling keeps the settings and the sign-in. |
Catalogue and projects
| Problem | Solution |
|---|---|
| An excessive number of opened templates was detected | Database protection. Access is restored after an hour. |
| The template cannot be downloaded (Download error) | Connection to the server dropped; try again. If the error persists, write to support with the vehicle name. |
| The vehicle is not in the catalogue | Request a template in the side panel, with a photo of the vehicle. |
| The project cannot be saved (You are not logged in to the server) | The connection to the server dropped. Check the internet; the program signs in again when the connection returns, otherwise log out and in again. |
Workspace
| Problem | Solution |
|---|---|
| A part is red | It crosses the film edge or overlaps another part. Move it; a red part is not cut correctly. |
| A tool cannot start, the status bar says to finish the current function first | Another tool has an open palette. Confirm it or press Esc. |
| A part under another part cannot be grabbed | Ctrl+Alt + click selects the lower part, or send the upper one backward. |
| Parts changed by accident | Undo (Ctrl+Z) reverts every step including a whole nesting. |
| Auto-nesting says Select at least one part | Select the parts before starting (Ctrl+A). |
Plotter and cutting
| Problem | Solution |
|---|---|
| Auto-detect does not find the plotter | Check the cable and power; for a serial connection install the manufacturer's USB-COM driver and enter the port by hand (Device Manager shows the COM number). |
| The USB plotter does not respond | For plotters with a printer driver (GCC, Roland) choose the Printer connection; for the others COM port with the same baud rate as on the machine. |
| The network plotter does not respond | Verify the IP address on the machine display, the port (usually 9100) and that the computer is on the same network. |
| The cut is mirrored or runs outside the film | Mirror X / Y in the plotter settings; set the origin on the machine. |
| The cut does not start: the workspace is wider than the plotter width | Reduce the film width on the bar or correct the plotter width in Devices. |
| Separation says it needs 1 mm of space | Move the parts away from the film edge or switch separation off. |
| Sending failed, what about the credit? | On failure the program returns the reserved credit; you can see it in My account → Top-up history. |
Program log
The program writes its activity to the file %LOCALAPPDATA%\ExactCut\exactcut.log. Attach it to the e-mail when reporting a problem; it contains no passwords or payment details.